After working out the messy details of my previous post series “Microsoft Graph Delta Query from Microsoft Flow” a great friend of my pointed out “It’s probably not a best practice to expose the application secret in plain text in your Flow.” Good point! I was more focused on the “transaction” of the Delta Query. So, how do you create a secure connection to your applications? You create a [Custom Connector in Flow] (https://docs.microsoft.com/en-us/connectors/custom-connectors/).
Create a Custom Flow Connector to Access the Microsoft Graph
My biggest challenge in making this connector work was the Authentication. Then I was introduced to Jason (@JasonJohMSFT) who helped develop the Contoso Airlines Sample. He was immensly helpful getting me on track with troubleshooting the connection issues. (Long story short…it was me.)
The steps are pretty straight forward once you have done one. In the coming days I’ll punch out a video to support this post. The steps are:
- Create a V2 App in Azure - this UI is currently in Preview but makes it easy.
- Create a Postman Collection - Optional, but I highly recommend it.
- Create a Custom Flow Connector - You can do this from scratch, but I recomend using Postman.
Create an Azure App
Previously I demonstrated how to create an Azure App so that you can access the Microsoft Graph API. In this post I am going to use the V2 interface, currently in preview, to do the same thing. The fine folks at Microsoft have made the process of creating and consenting apps significantly easier as you will see.
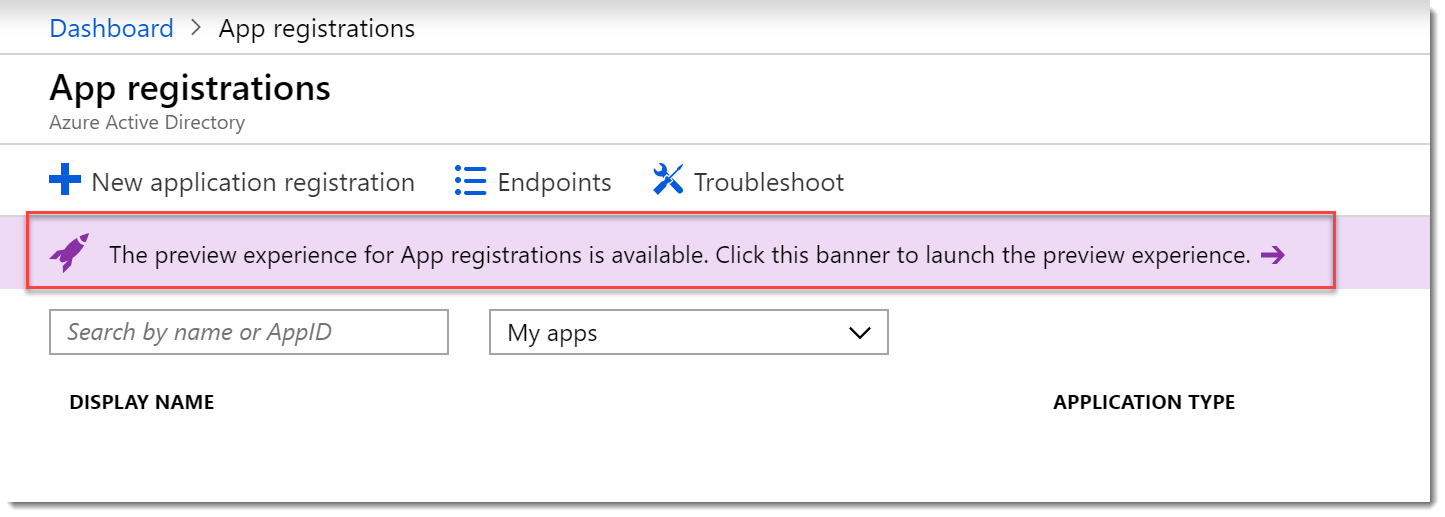
- Login to the Azure Portal and search for “App registrations”.
- While in Preview you click on the “Preview experience” banner.
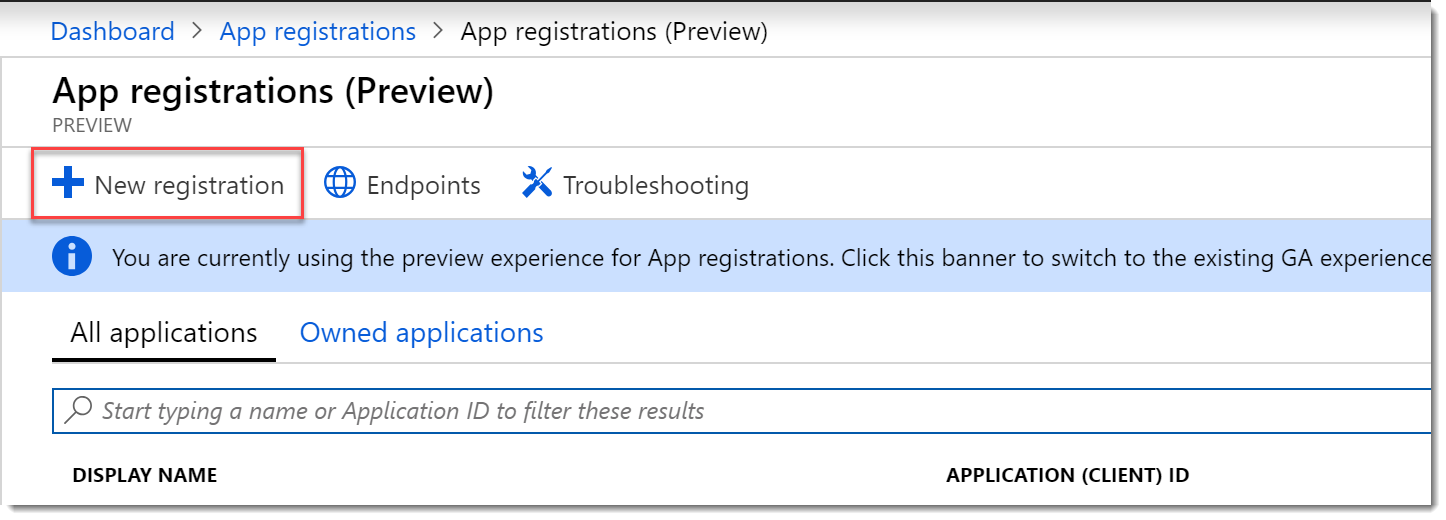
- On the App registrations (Preview) page choose New registration.
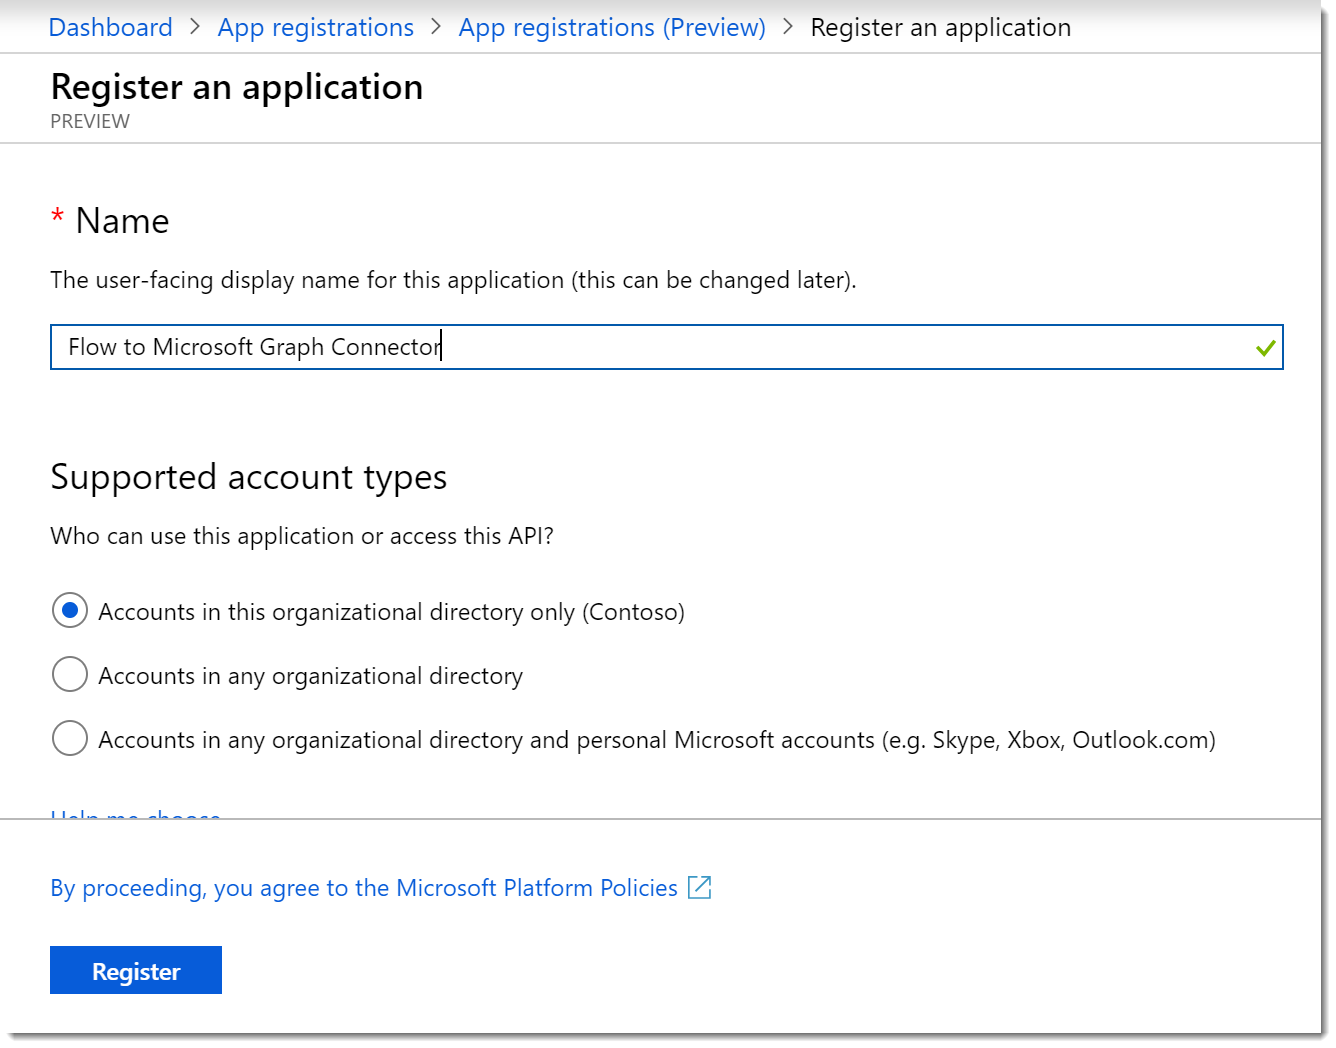
- On the Register an applcation page provide a title like Flow to Microsoft Graph Connector. Choose the account types you wish to support, since we got here because of security concerns, I am choosing Accounts in this organizational directory only. Leave the Redirect URL blank for now. Click Register.
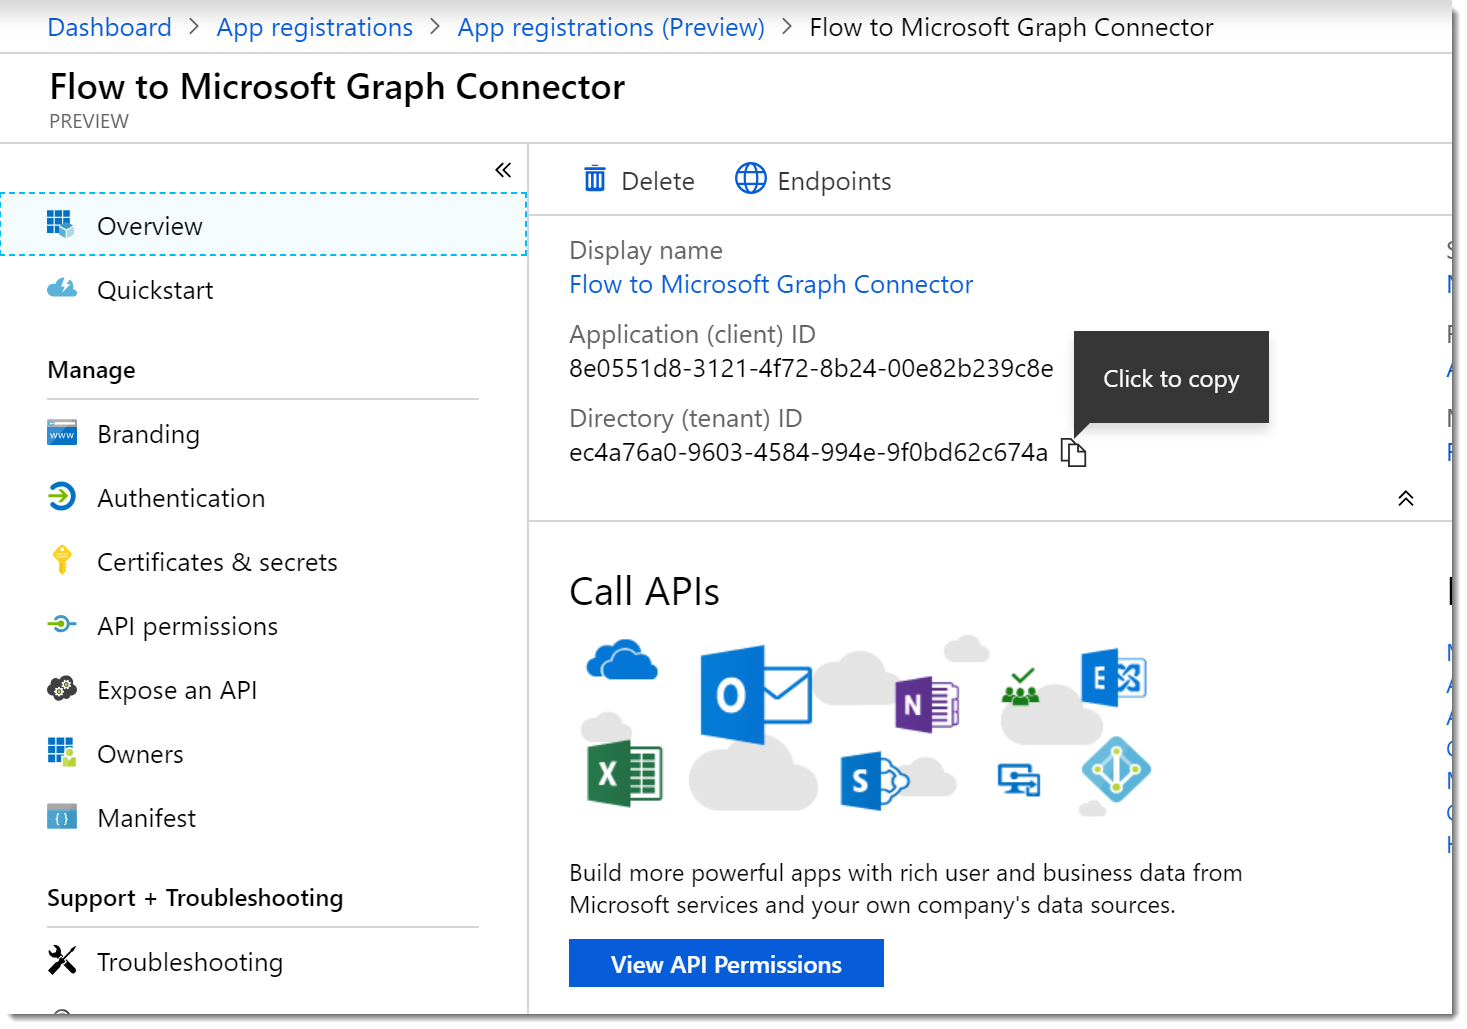
- Once the registration is complete you will be redirected to your new App home page. Notice that all the info that we used to have to hunt for is presented nicely for us! They even included those cool little “copy to clipboard” widgets!
Grant API Permissions
- We need to grant access to the Microsoft Graph for our App, so click View API Permissions. On the API permissions blade click Add a permission. On the Request API permissions blade choose the Microsoft Graph option. Choose the Application permissions option.
- In the Select permissions search box type Group and select the check box for Group.Read.All.
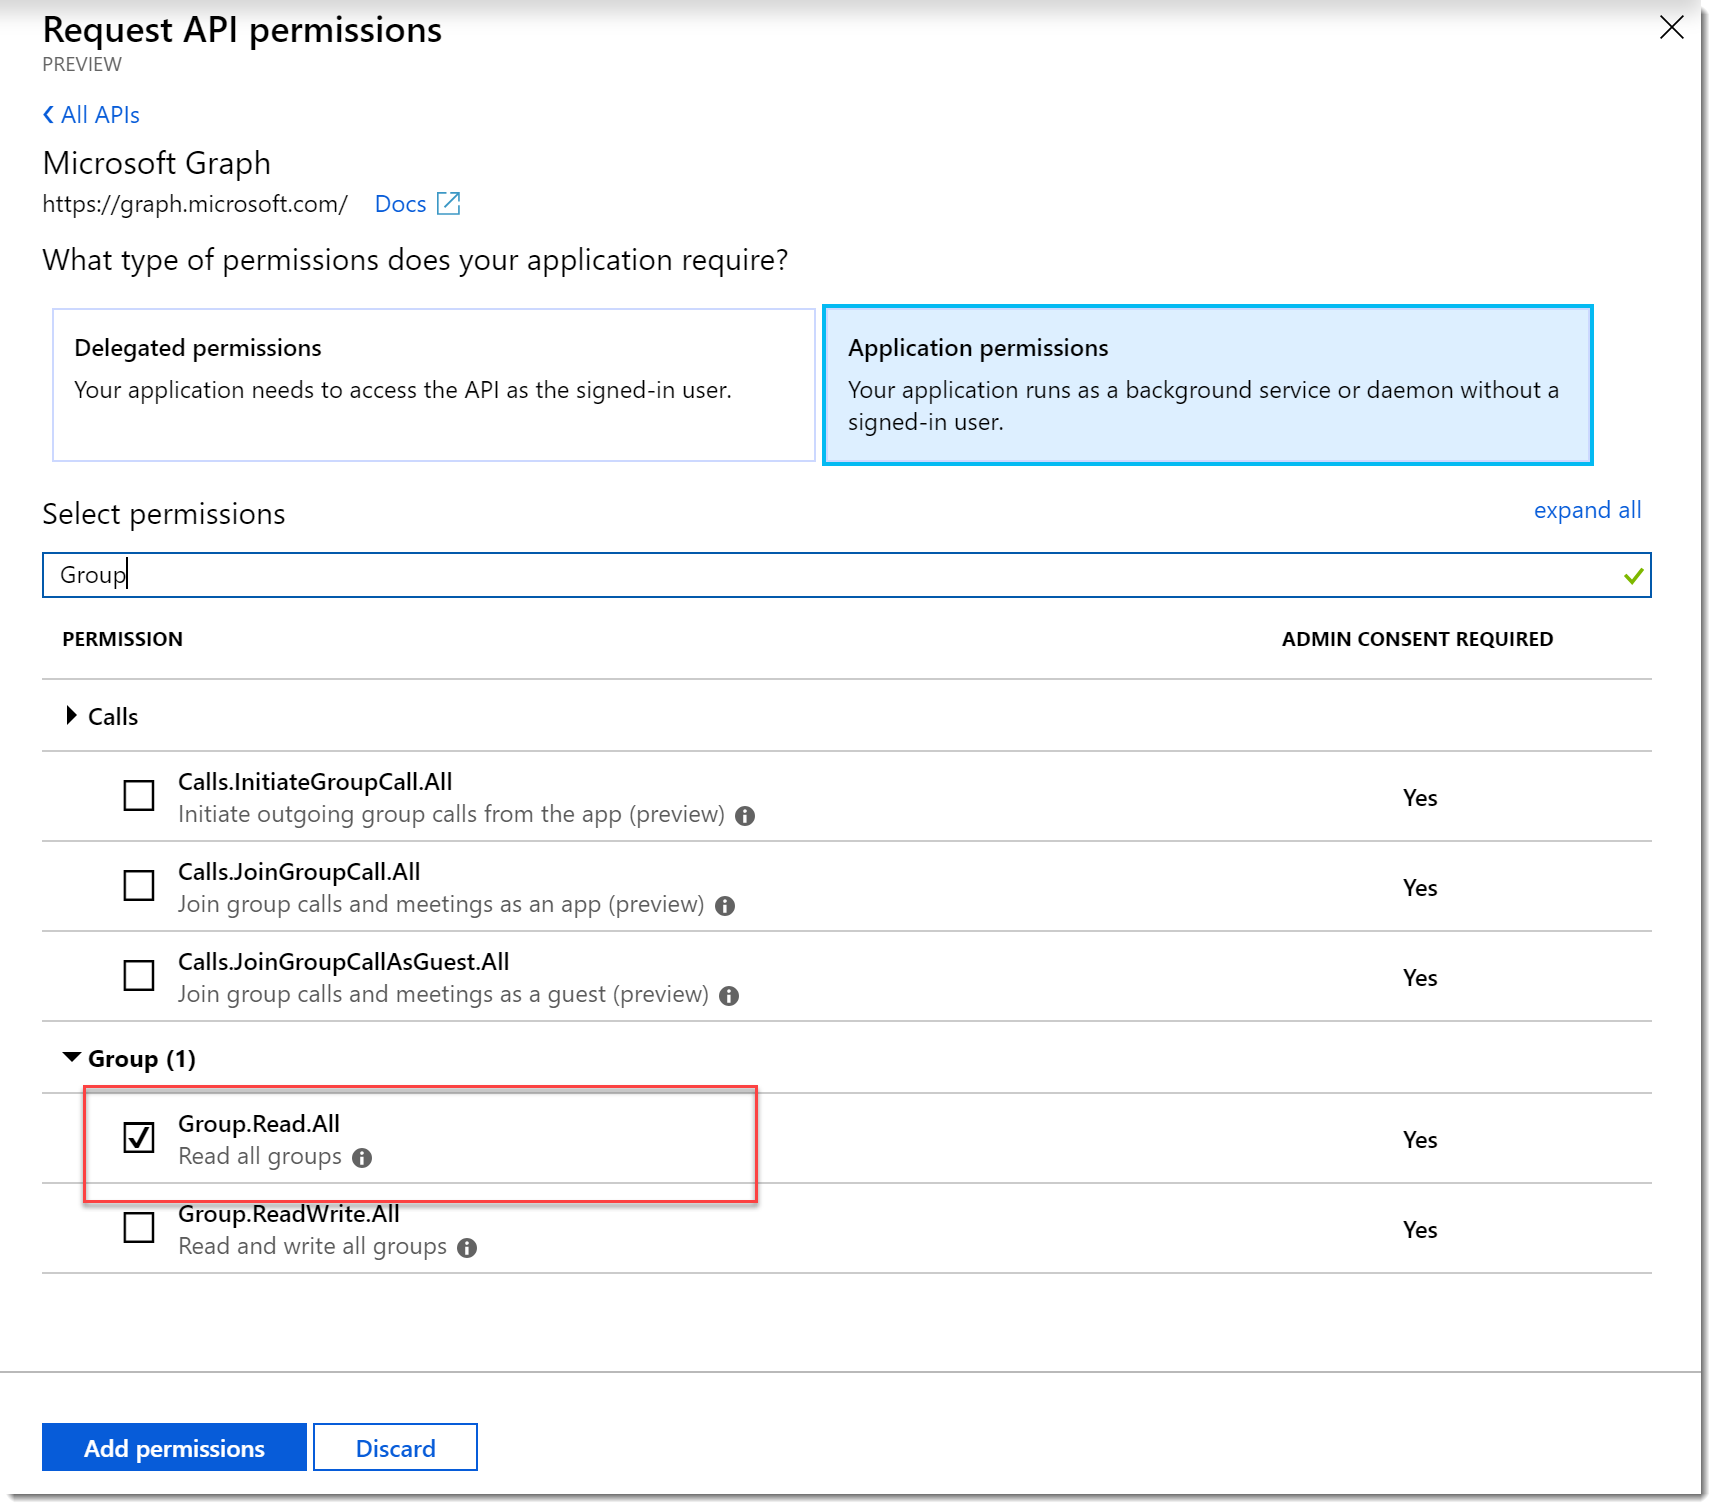
- Perform another search for User and choose User.Read.All.
- Click Add permissions.
- Note the warning about the changes to permissions. Click Grant admin consent for… to provide admin consent.
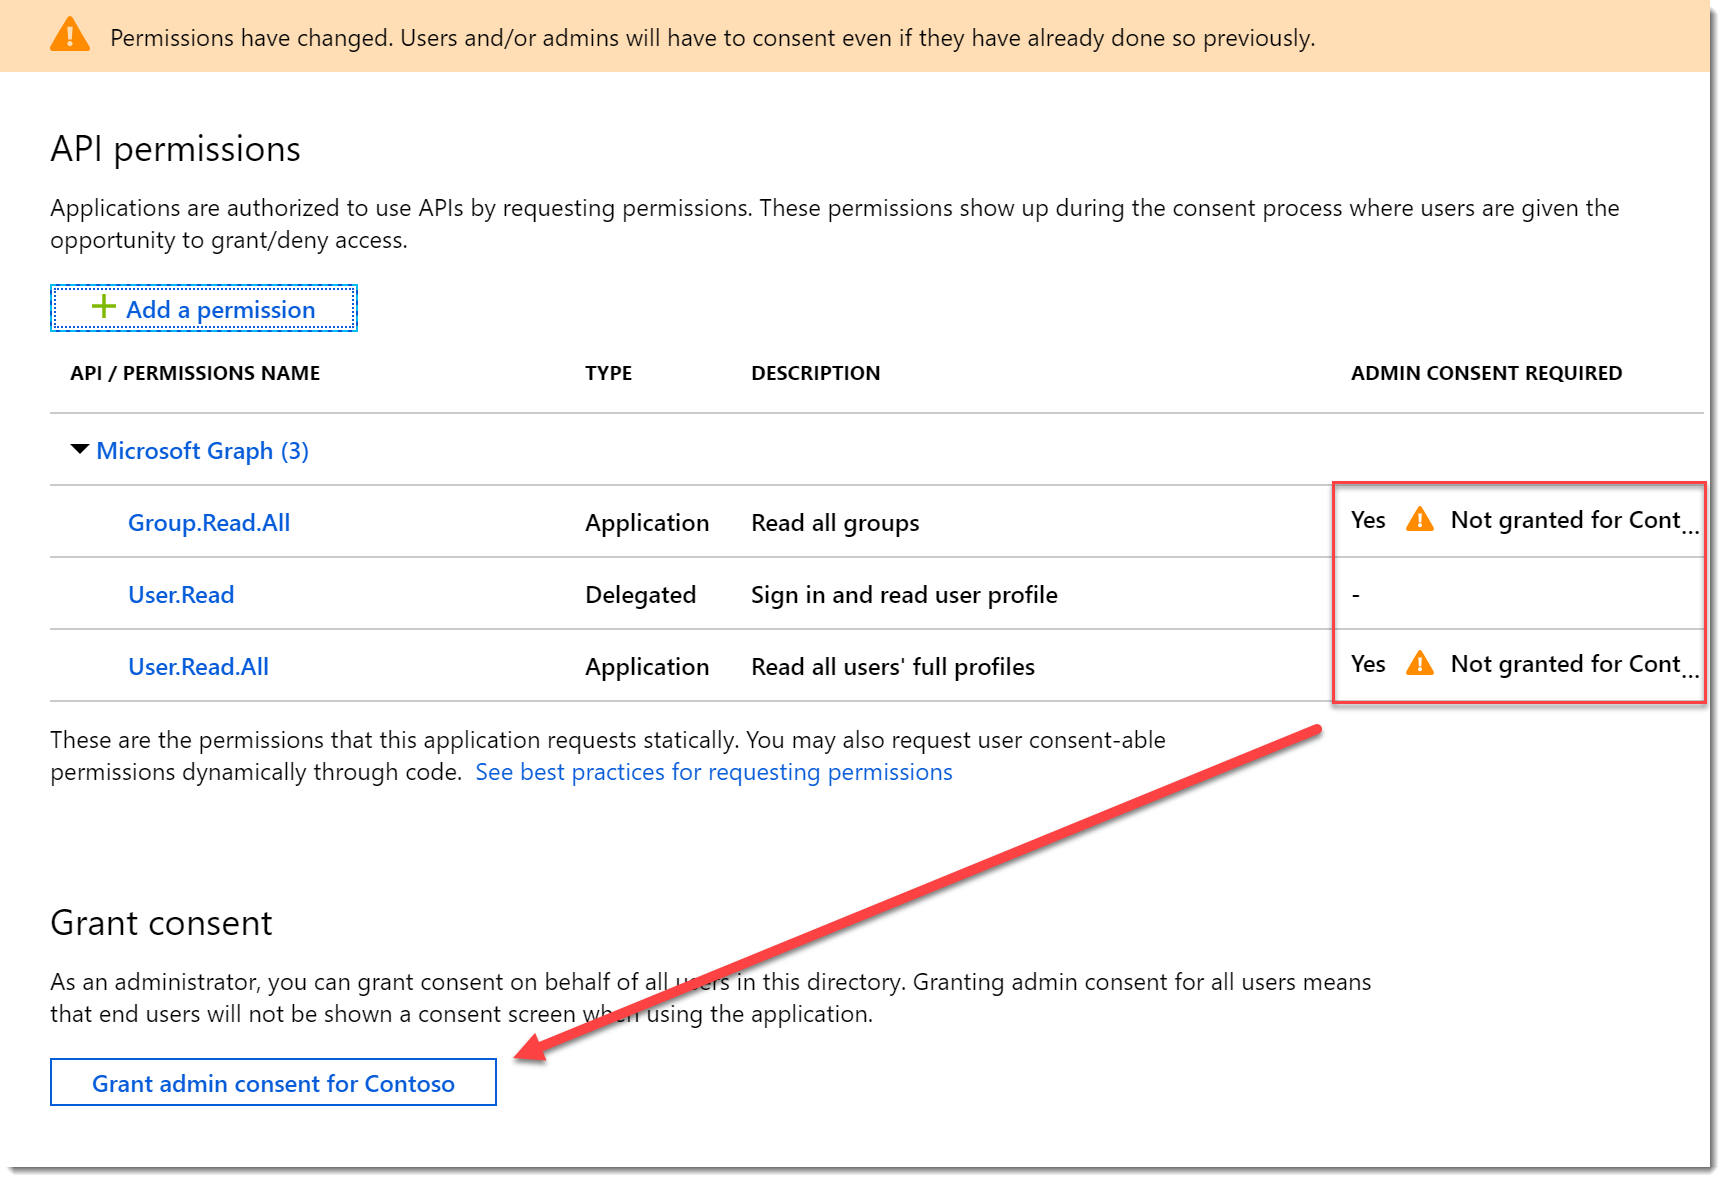
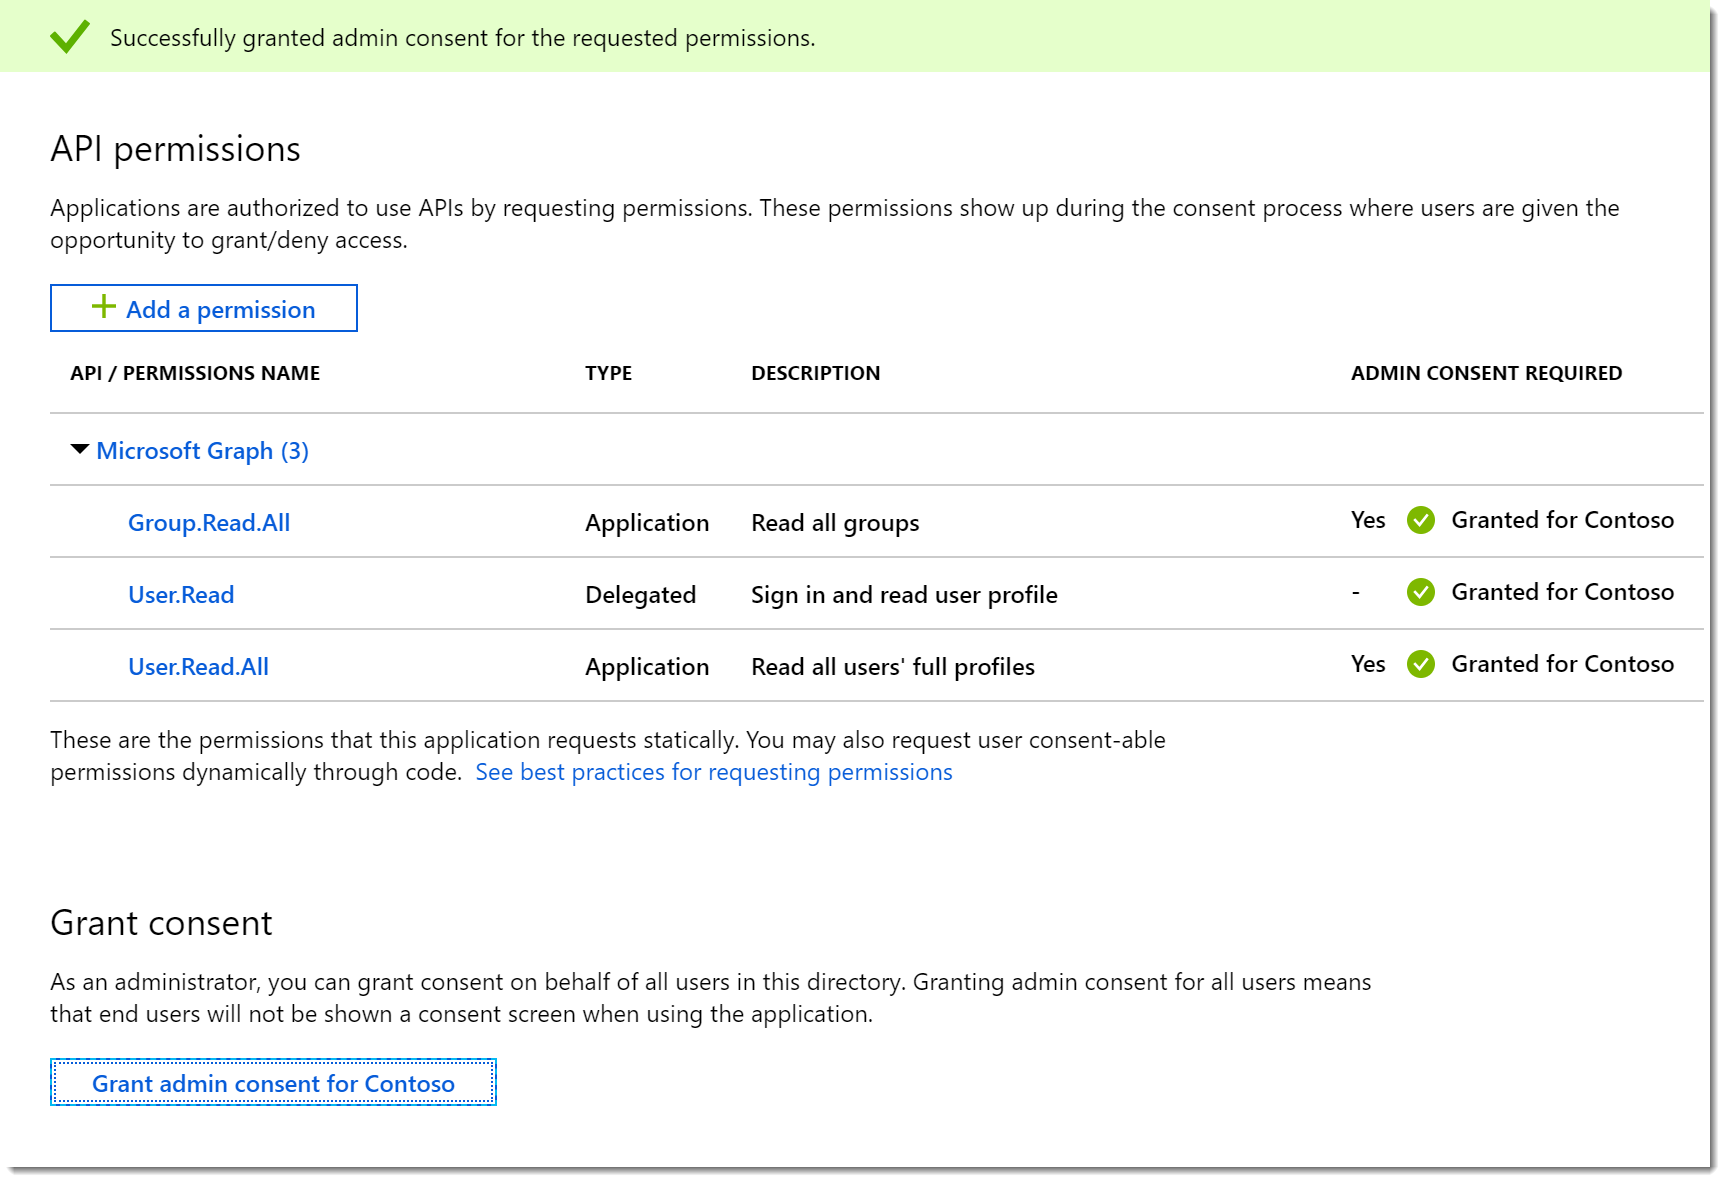
- You should now see the consent applied.
Create the Application Secret
- Click Certificates and secrets. On the Certificates and secrets blade click New client secret.
- Give the secret a Description and Expires value. Click Add.
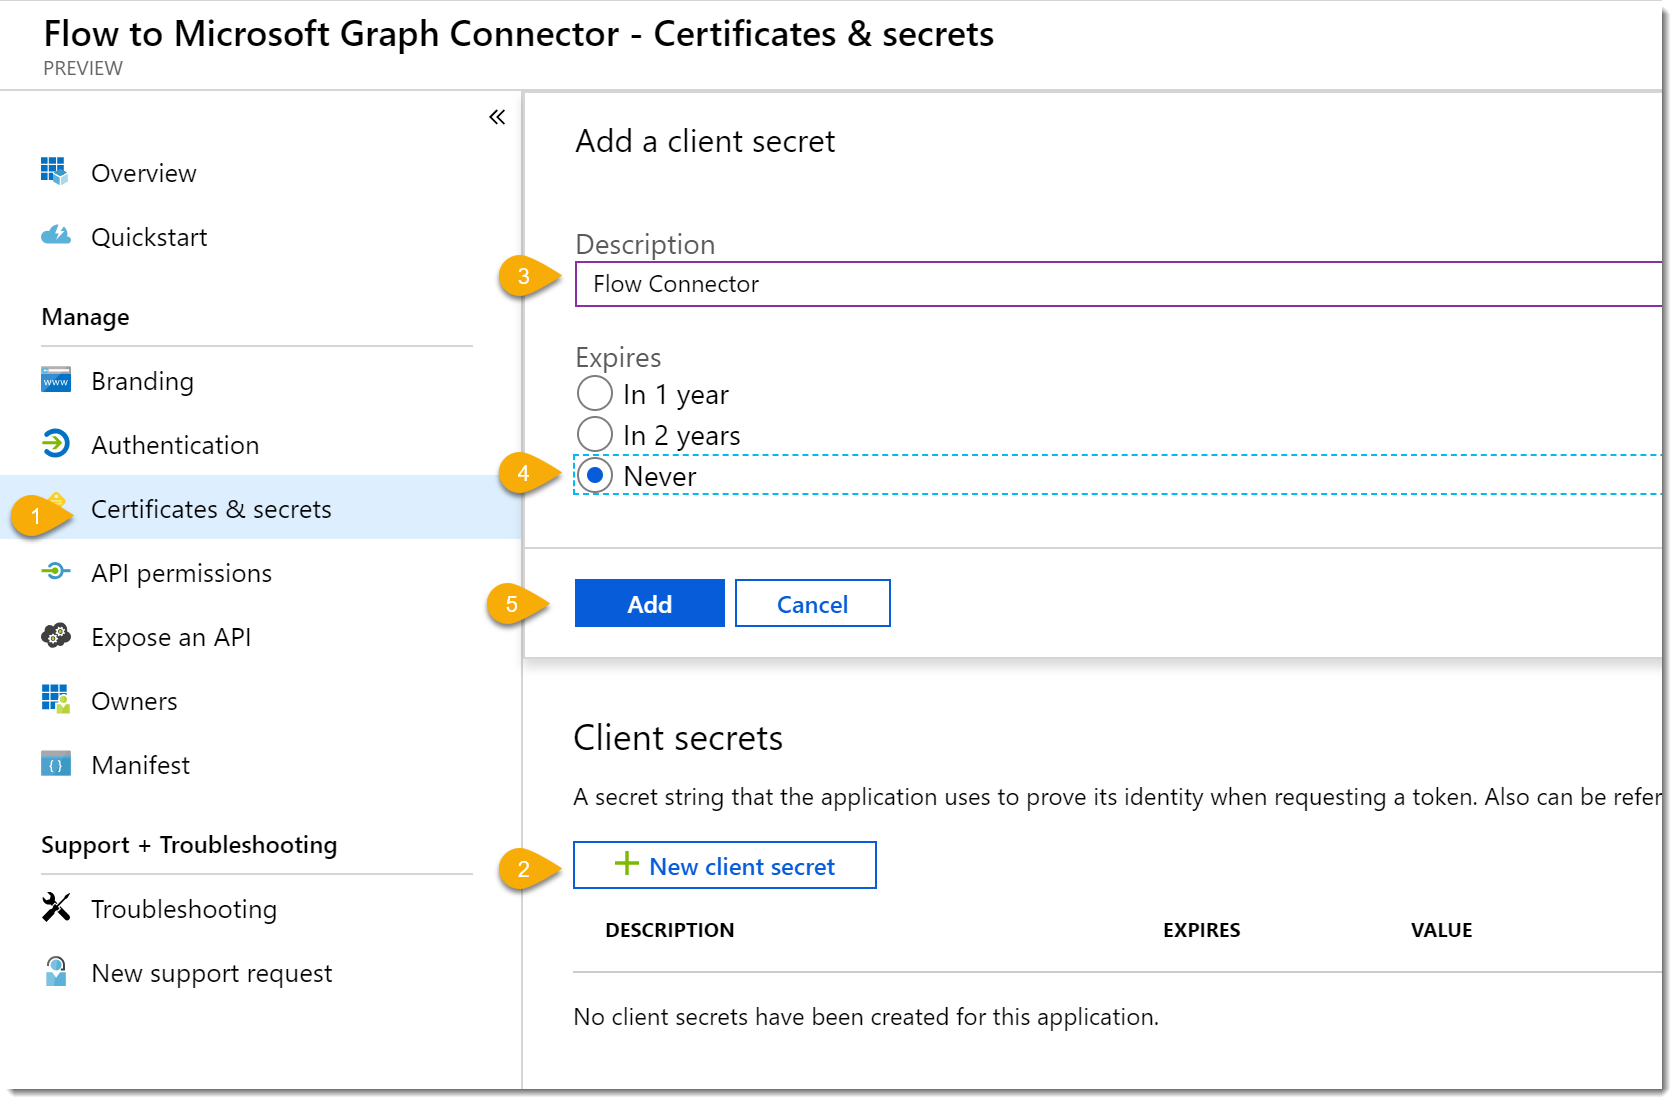
- Copy the secret value and store it somewhere safe. When you close the blade the value will not be displayed again.
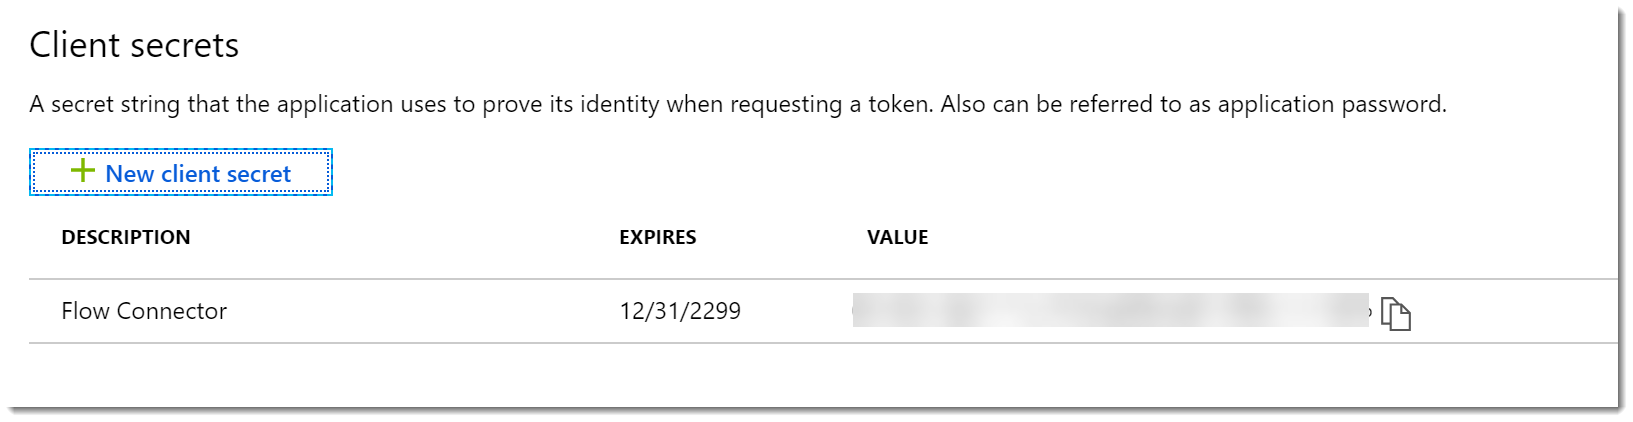
- Click Overview to close the blade.
Create a Postman Collection
I say that this step is optional, but I see it as a necessary part of the process. It certainly helped me while I was debugging the process. (Didn’t it, Jason.) Certainly, for more complicated APIs I think it’s a necessity as you will be able to import the exported collection into Flow.
Prepare the App for Postman
- We have to let our app know about Postman. Return to your app Overview page and choose Add a redirect URI
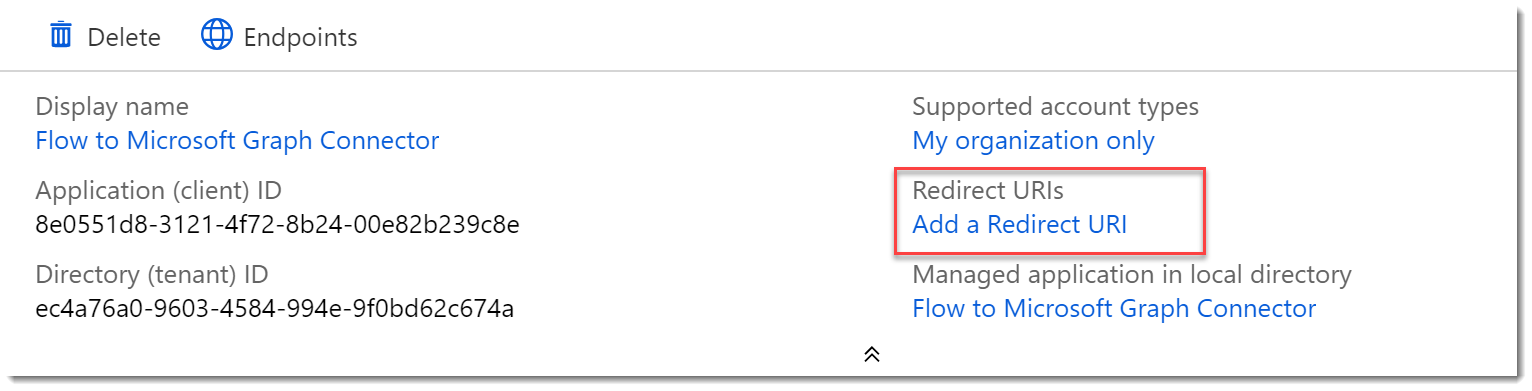
- On the Redirect URIs page add a Web Type URI of https://app.getpostman.com/oauth2/callback.
- Click Save.
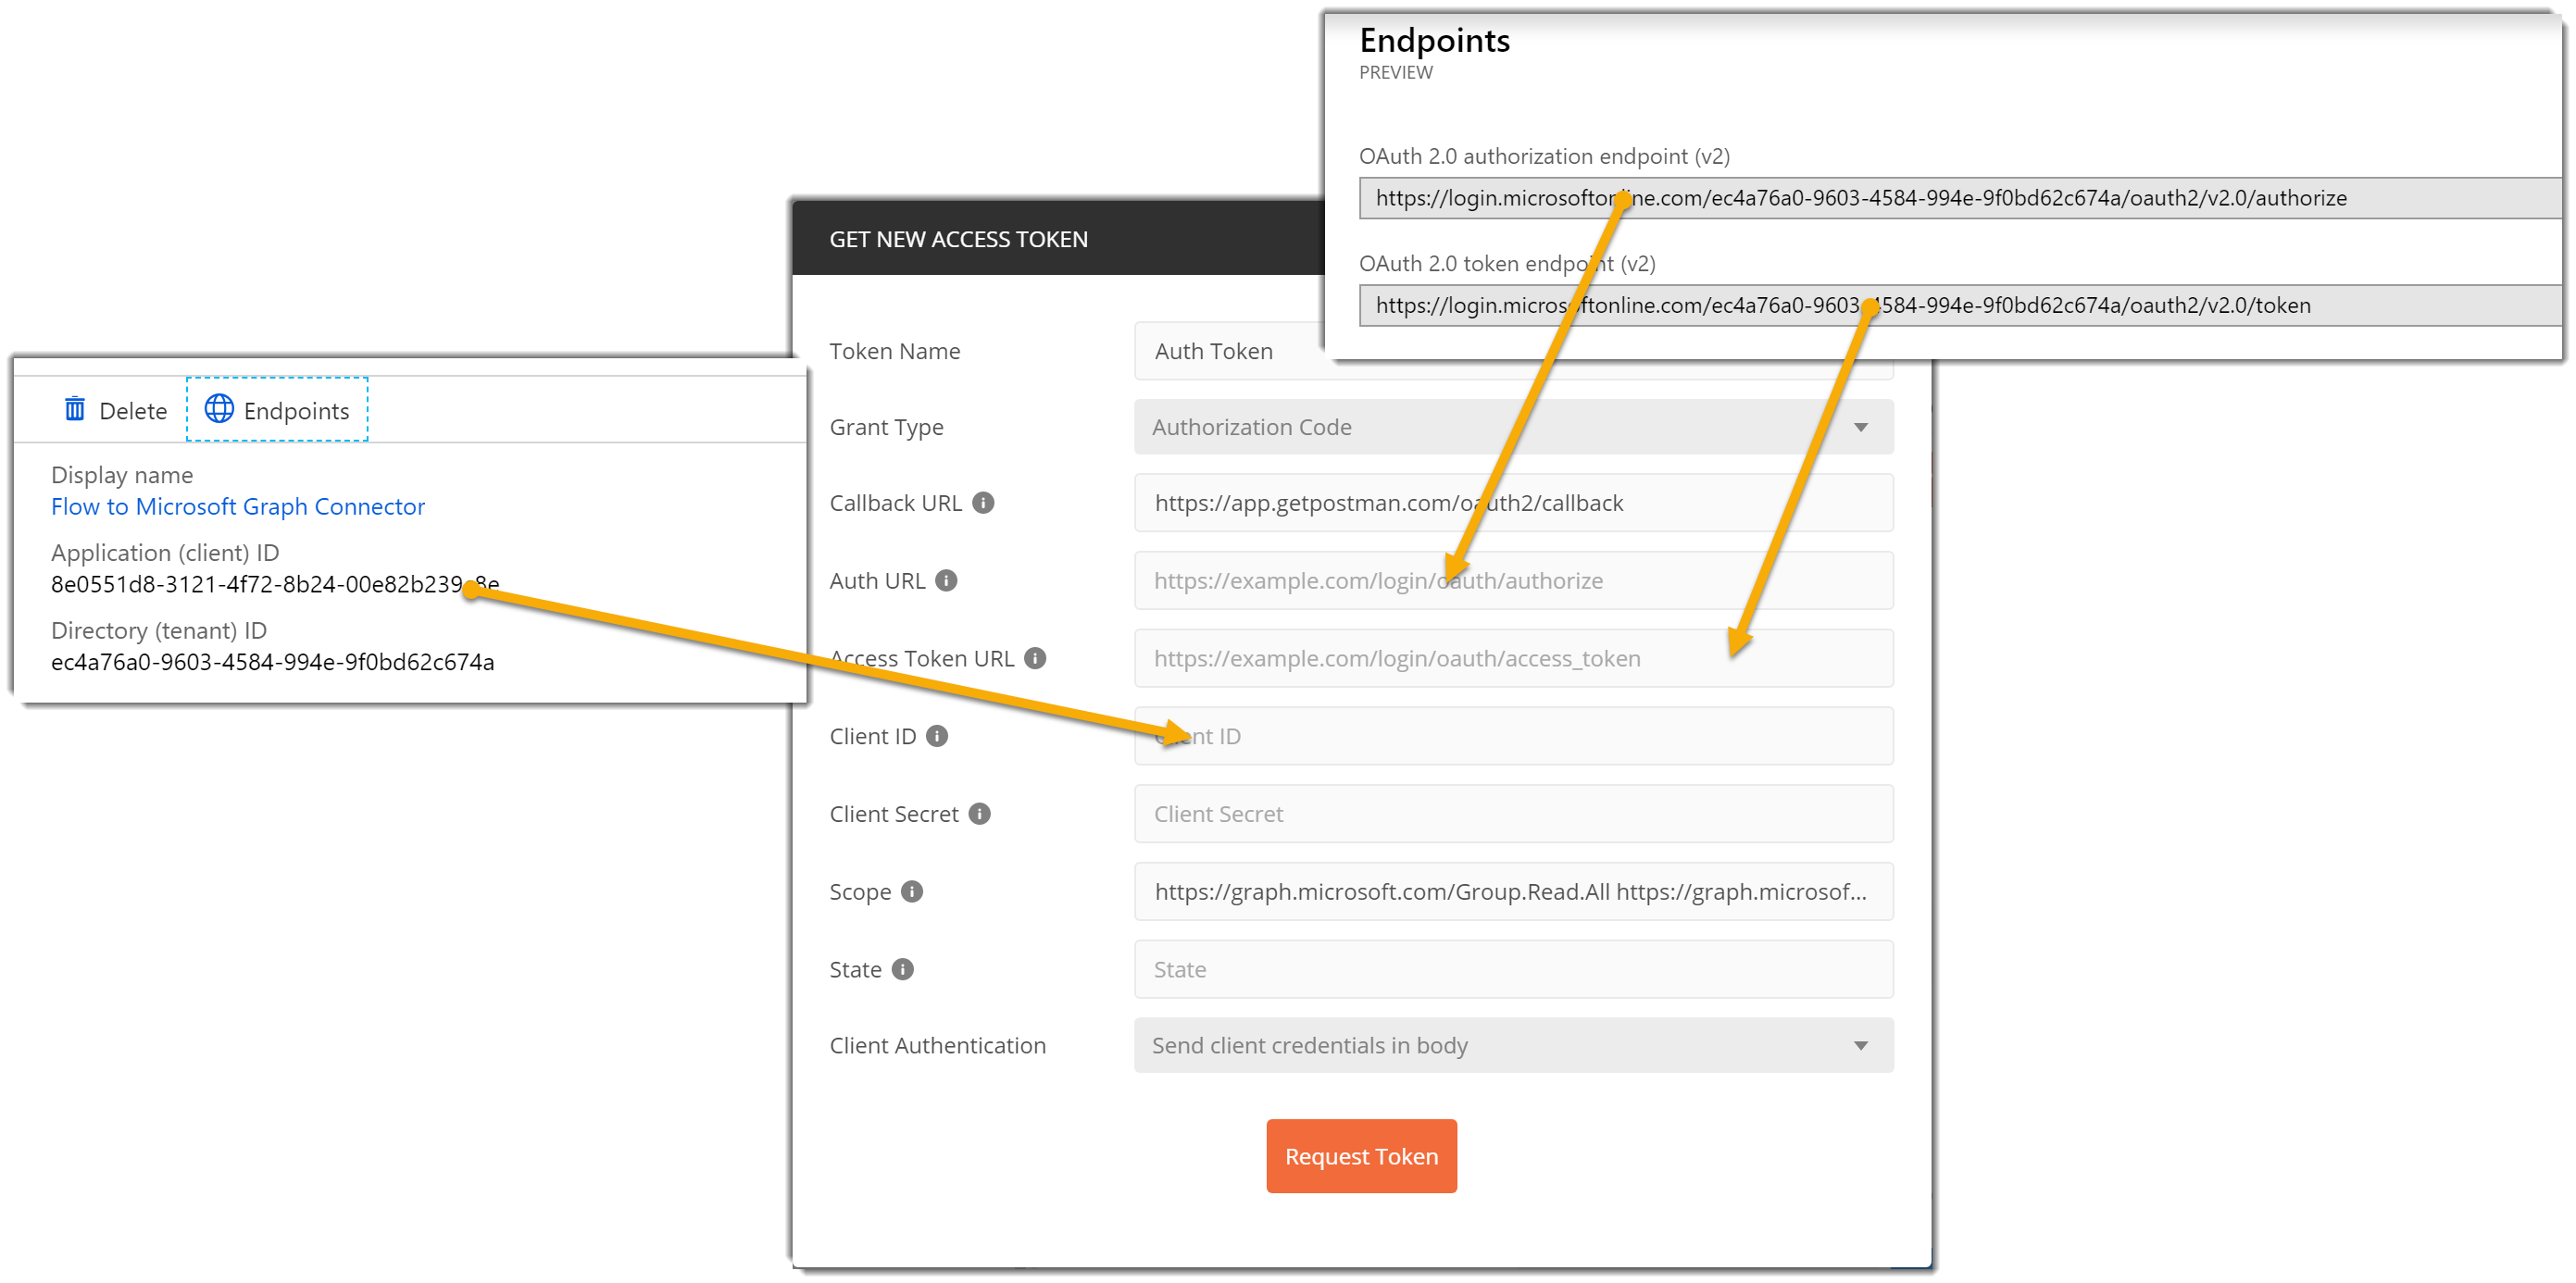
- Click Overview and then Endpoints to open the Endpoints blade. You will need it for reference in the next section.
Create a Postman Collection and Authenticate
- Open Postman and create a New | Collection. Give it a Name.
- Flip to the Authorization tab. Change the Type to OAuth 2.0.
- Click Get New Access Token.
- In the Get New Access Token dialog complete it as follows:
- Token Name: Auth Token
- Grant Type: Authorization Code
- Callback URL: https://app.getpostman.com/oauth2/callback
- Auth URL: Your OAuth 2.0 authorization endpoint (v2) from the App Endpoints blade.
- Access Token URL: OAuth 2.0 token endpoint (v2) from the App Endpoints blade.
- Client ID: Your app client ID
- Client Secret: Your app secret
- Scope: https://graph.microsoft.com/Group.Read.All https://graph.microsoft.com/User.Read.All
- State: Leave the default
- Client Authentication: Send client credentials in body
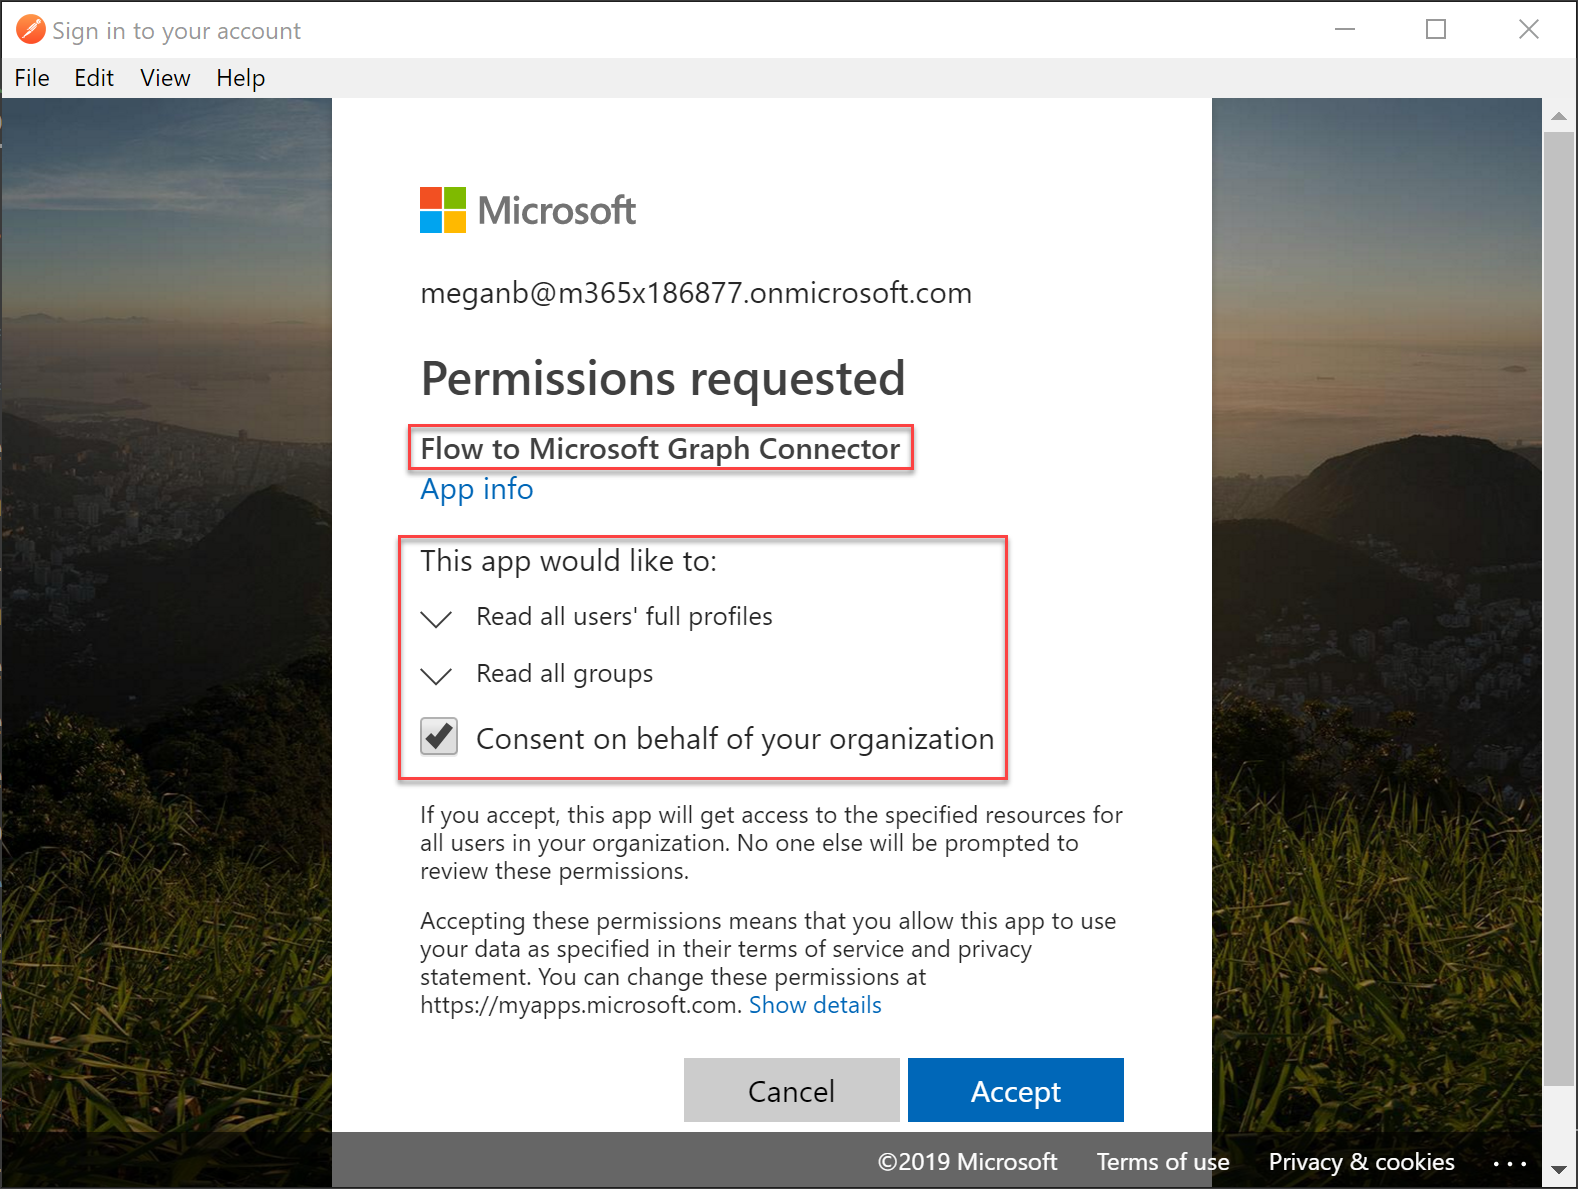
- Click Request Token. Postman will prompt you to login to Azure.
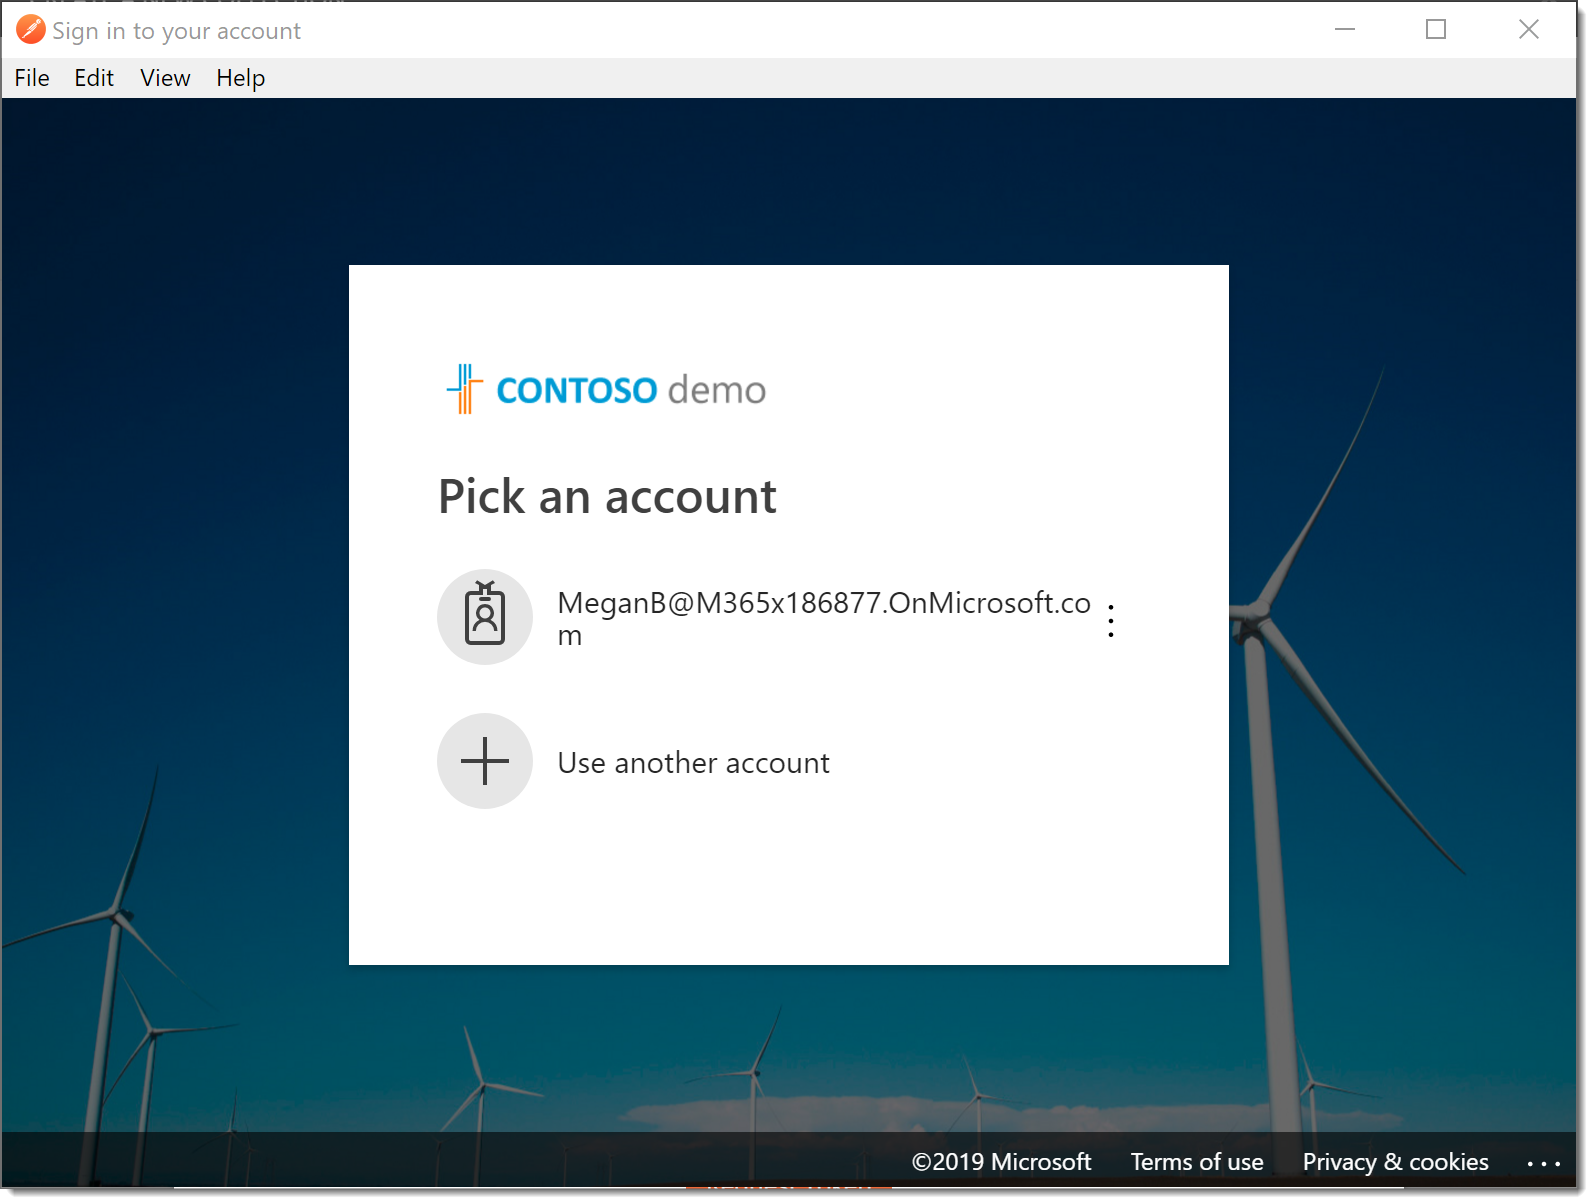
- You will have to consent to the permissions you requested in the Scope section of the dialog. Notice your app name! Go ahead and consent for everyone.
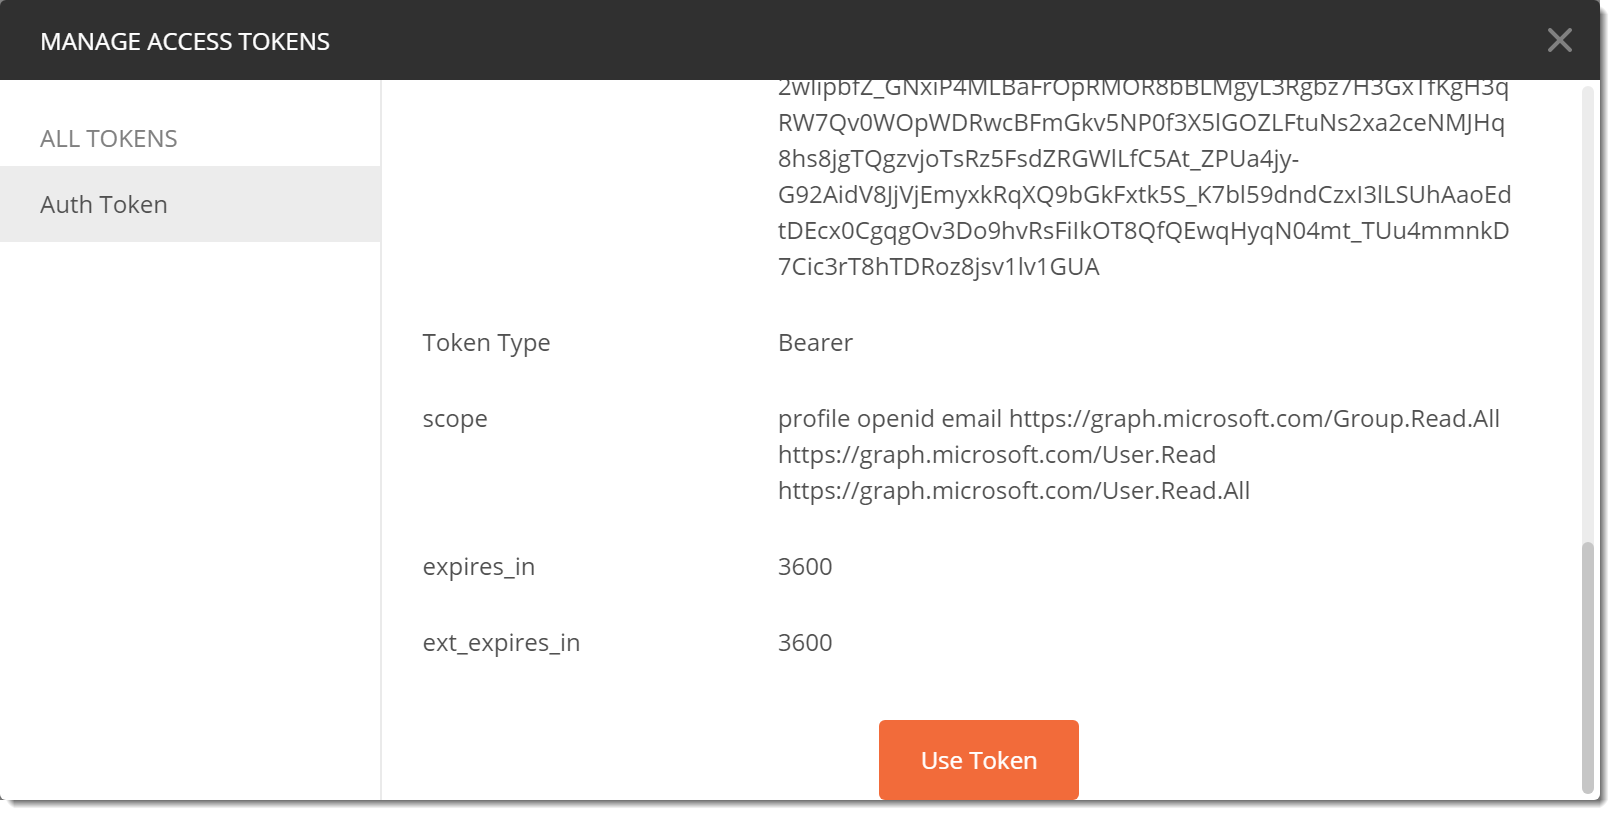
- Once authenticated you should be returned to the Manage Access Tokens dialog and your token will be displayed. You can scroll to the bottom and choose Use Token. (You should note that the scope you requested is returned in the dialog.)
- Click Create to complete the creation of your Postman Collection.
Make a Request
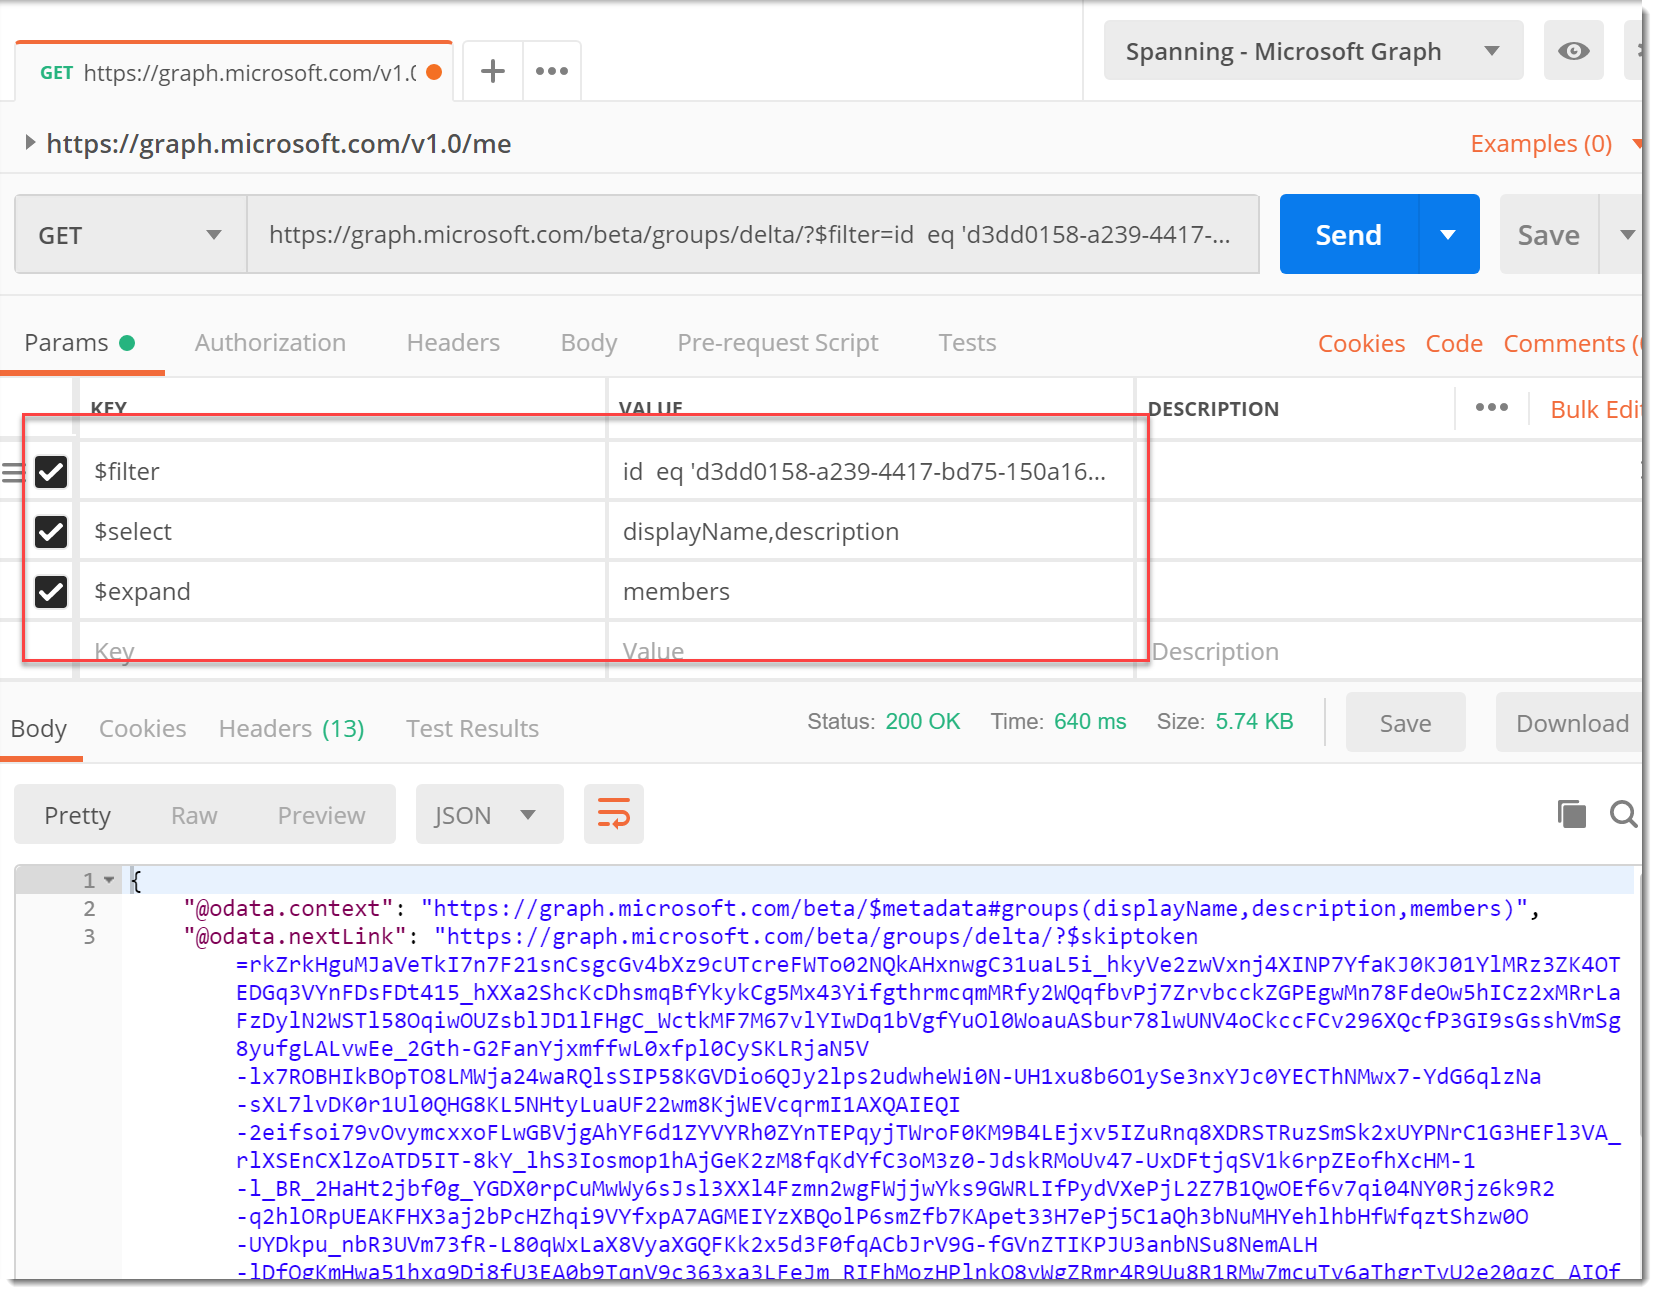
Now that we’re authenticated we need to make a request. Let’s start simple with a request for what the graph know about us.
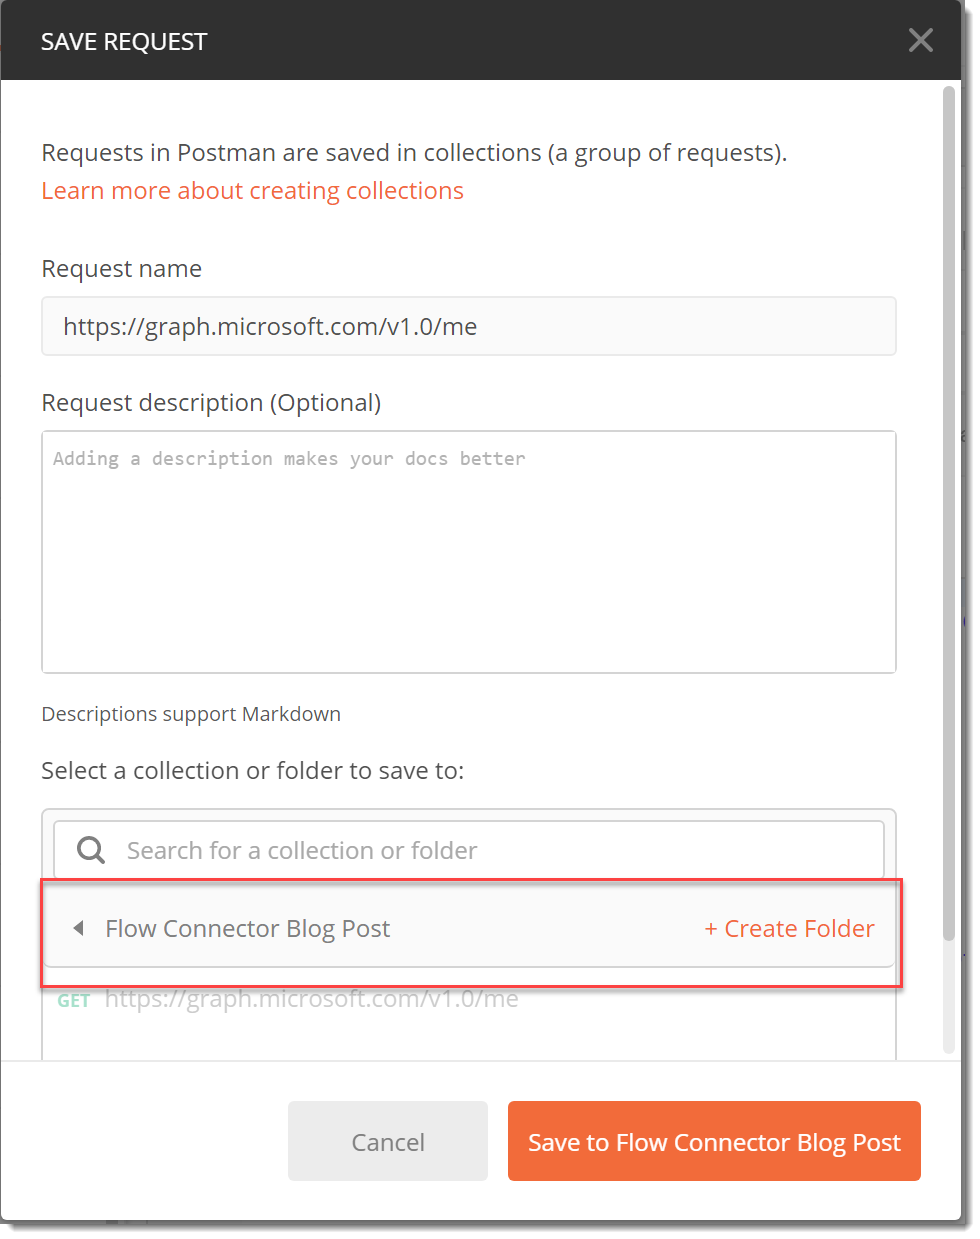
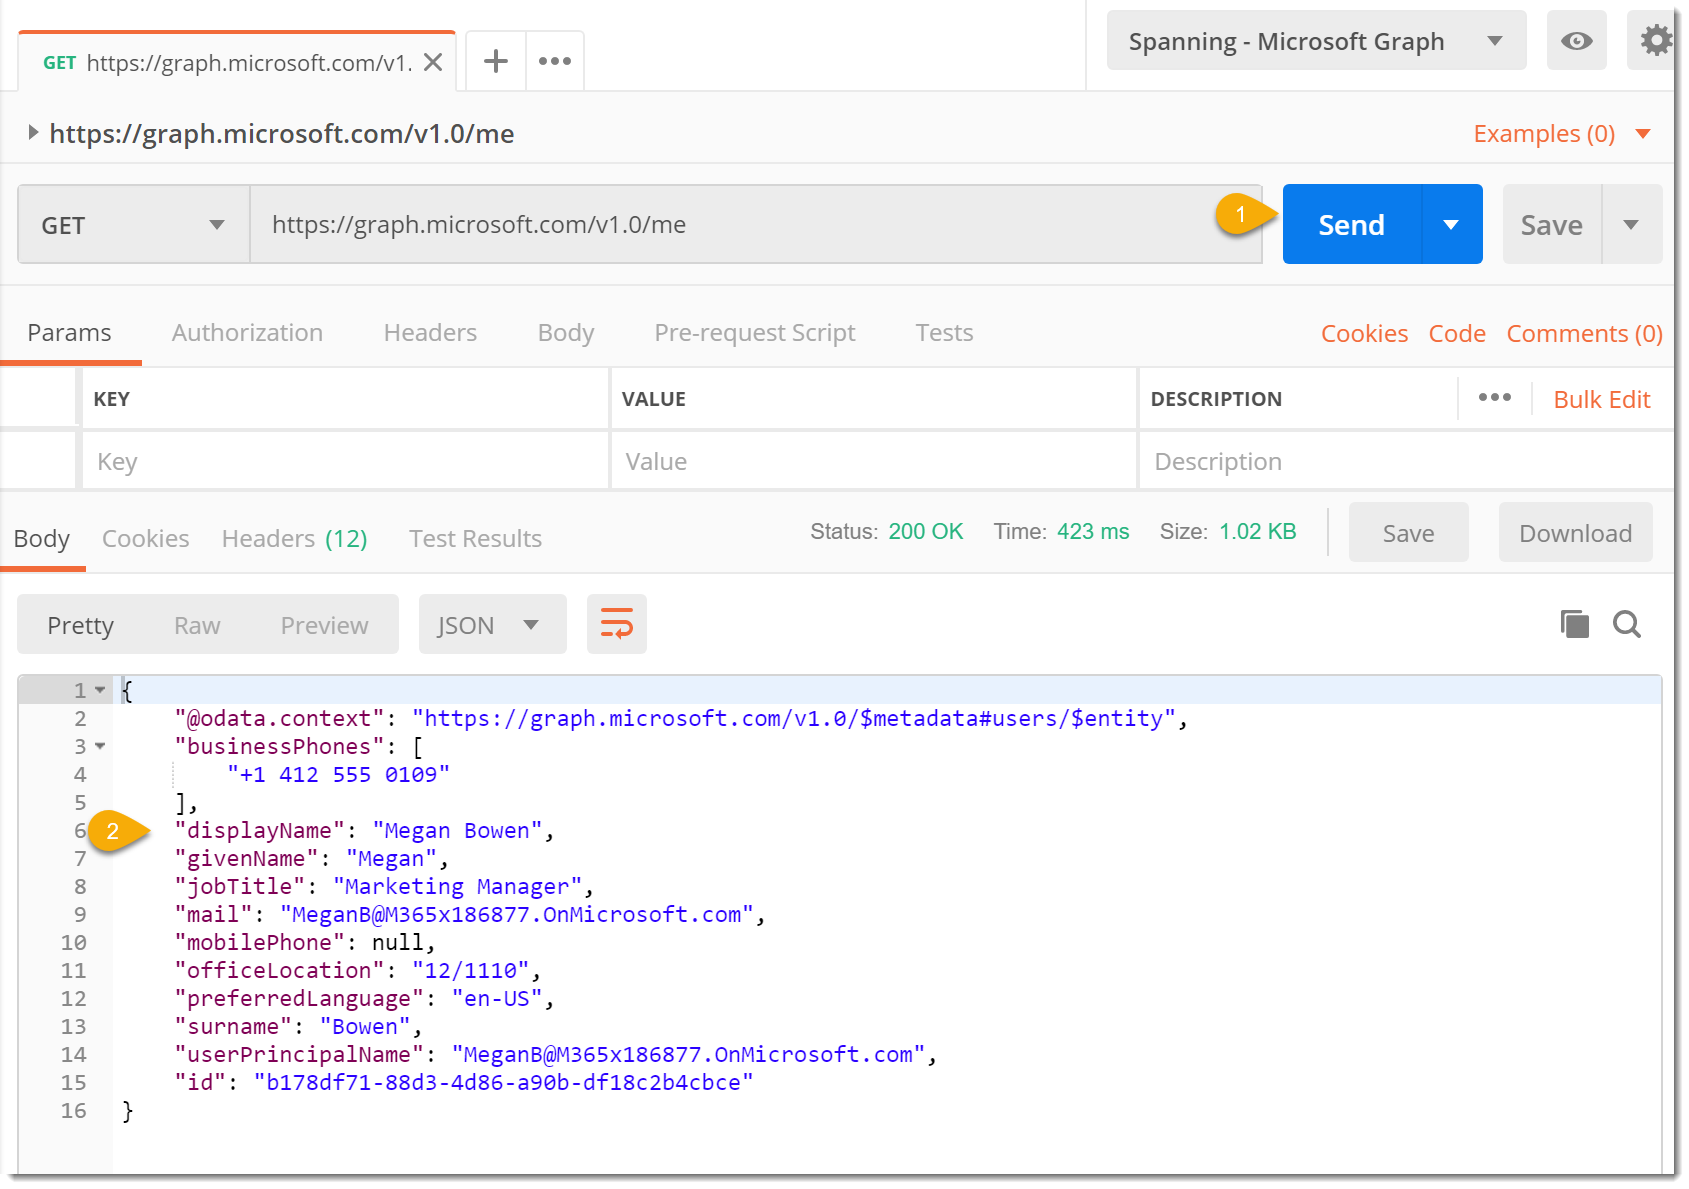
- In Postman add the URL https://graph.microsoft.com/v1.0/me to a tab. Ensure the method is GET. Save the request to the Collection you just created so that it will inherit the Authentication and the Token we just created.
- Click Send to submit your request and you should see a response body that contains your information.
- Now let’s make our groups request. Change the URL to the following where
{{group-id}}is the ID of your target group in Azure AD.https://graph.microsoft.com/beta/groups/delta/?$filter=id eq '{{group-id}}'&$select=displayName,description&$expand=members - Click Send and you should get the results of the Group Query. (If you read my previous posts on the topic this response should look familiar.)
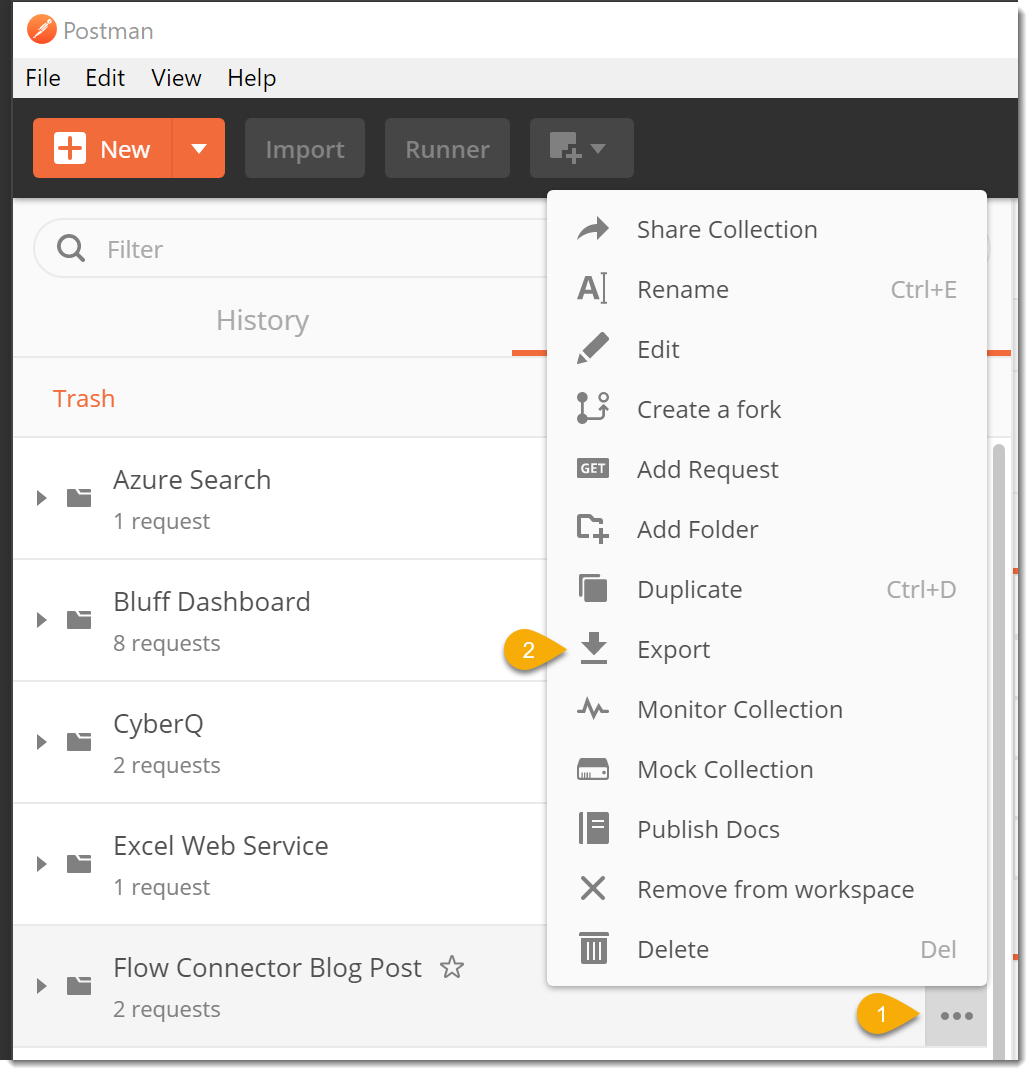
Export Your Collection
- Save your request.
- Click the … (the ellipses) next to the name of your collection and choose Export from the popup menu.
- In the Export Collection dialog, choose Collection V1 (deprecated) as this is the version supported by Microsoft Flow.
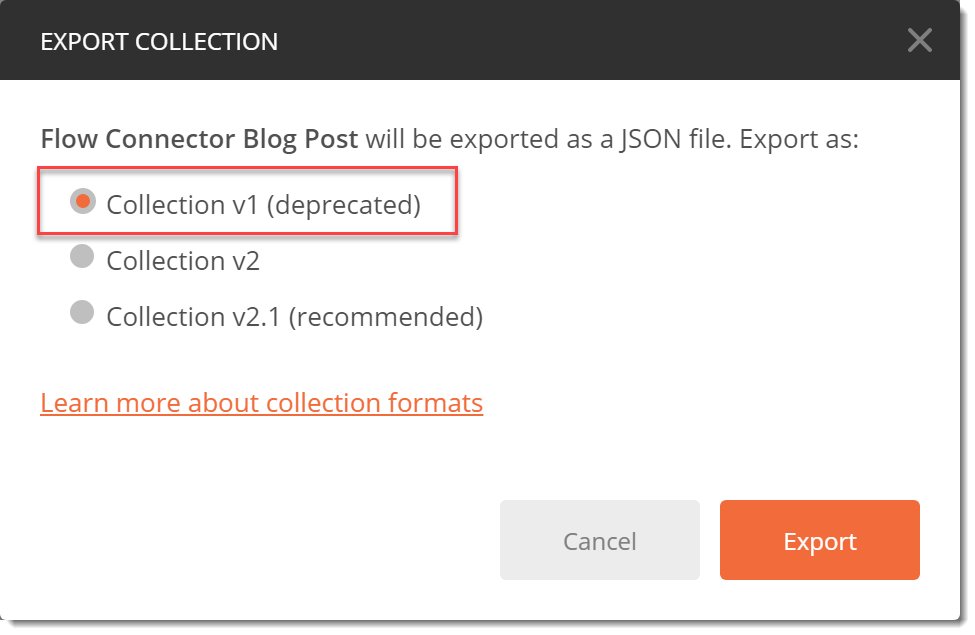
- Click Export and save the collection file to your Desktop.
Create a Custom Flow Connector
When I was creating my previous post, I was not aware of Custom Connectors in Microsoft Flow. This is a great capability. While it has been free, this is changing in February.
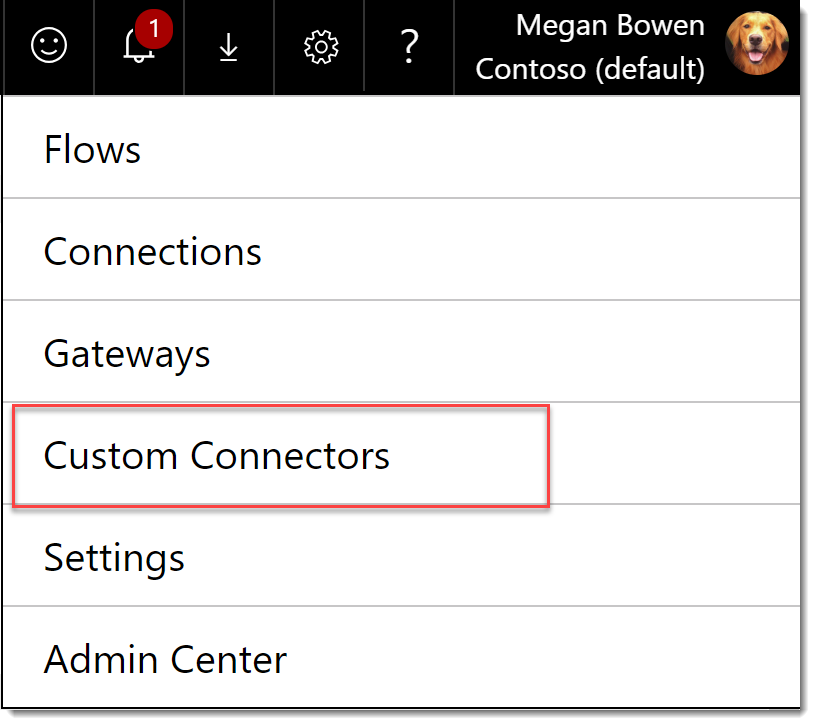
New Custom Connector from Postman Collection
-
Open Microsoft Flow and from the gear choose Custom Connectors.
-
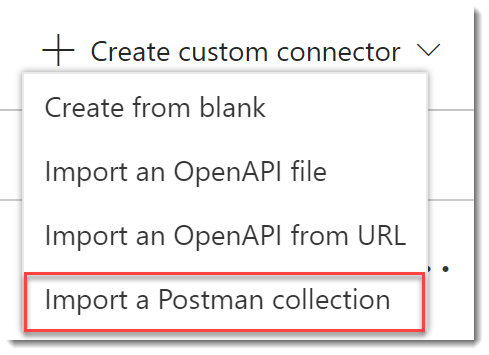
On the Custom connectors page choose Create custom connector | Import a Postman collection.
-
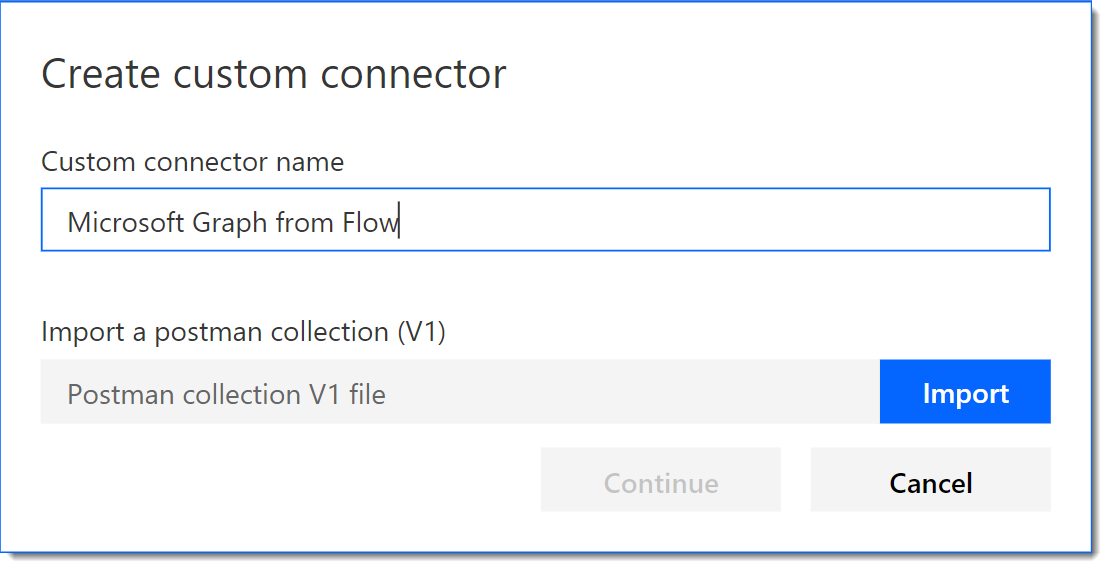
In the Create custom connector dialog, give your connector a Name and click Import to supply the file you previously saved. Choose Continue.
-
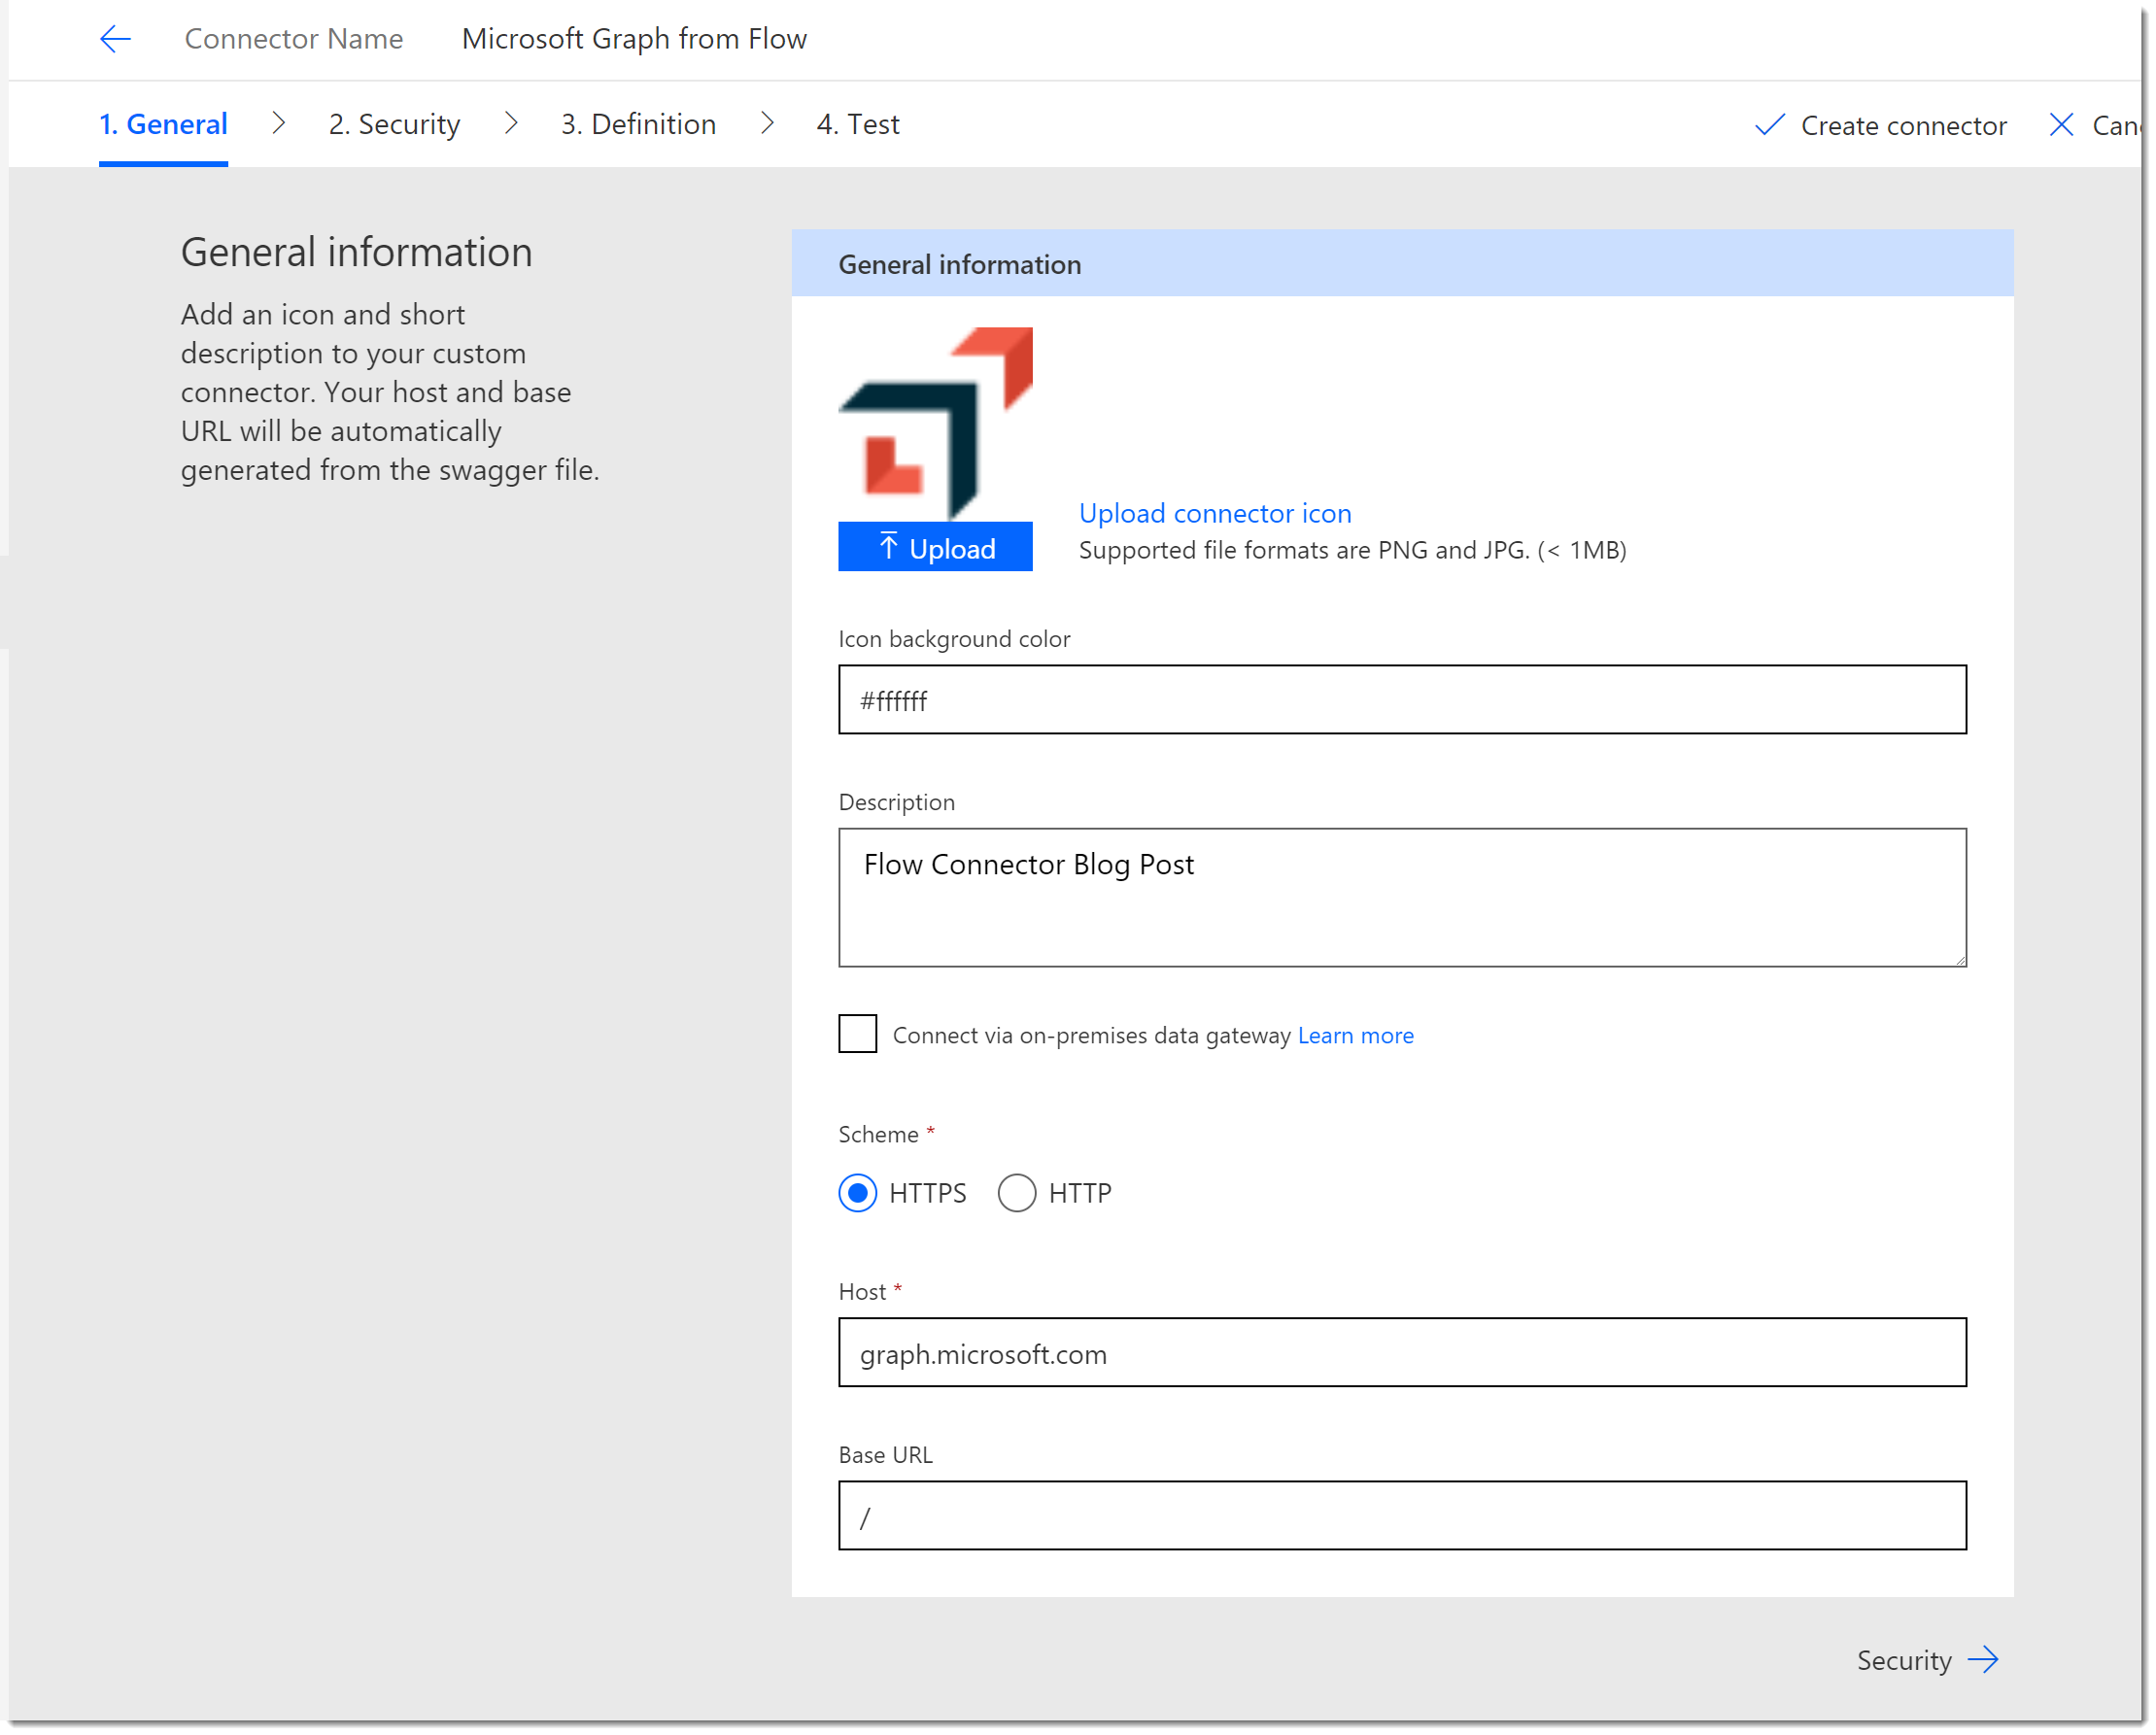
On the General Information page, upload an icon if you like and apply a background color. Notice that the Host address is already populated from our Postman collection.
Custom Connector Security
At this point there are probably issues on the Definition tab that will prevent you from saving your work. Let’s get the Security right and work through the issues.
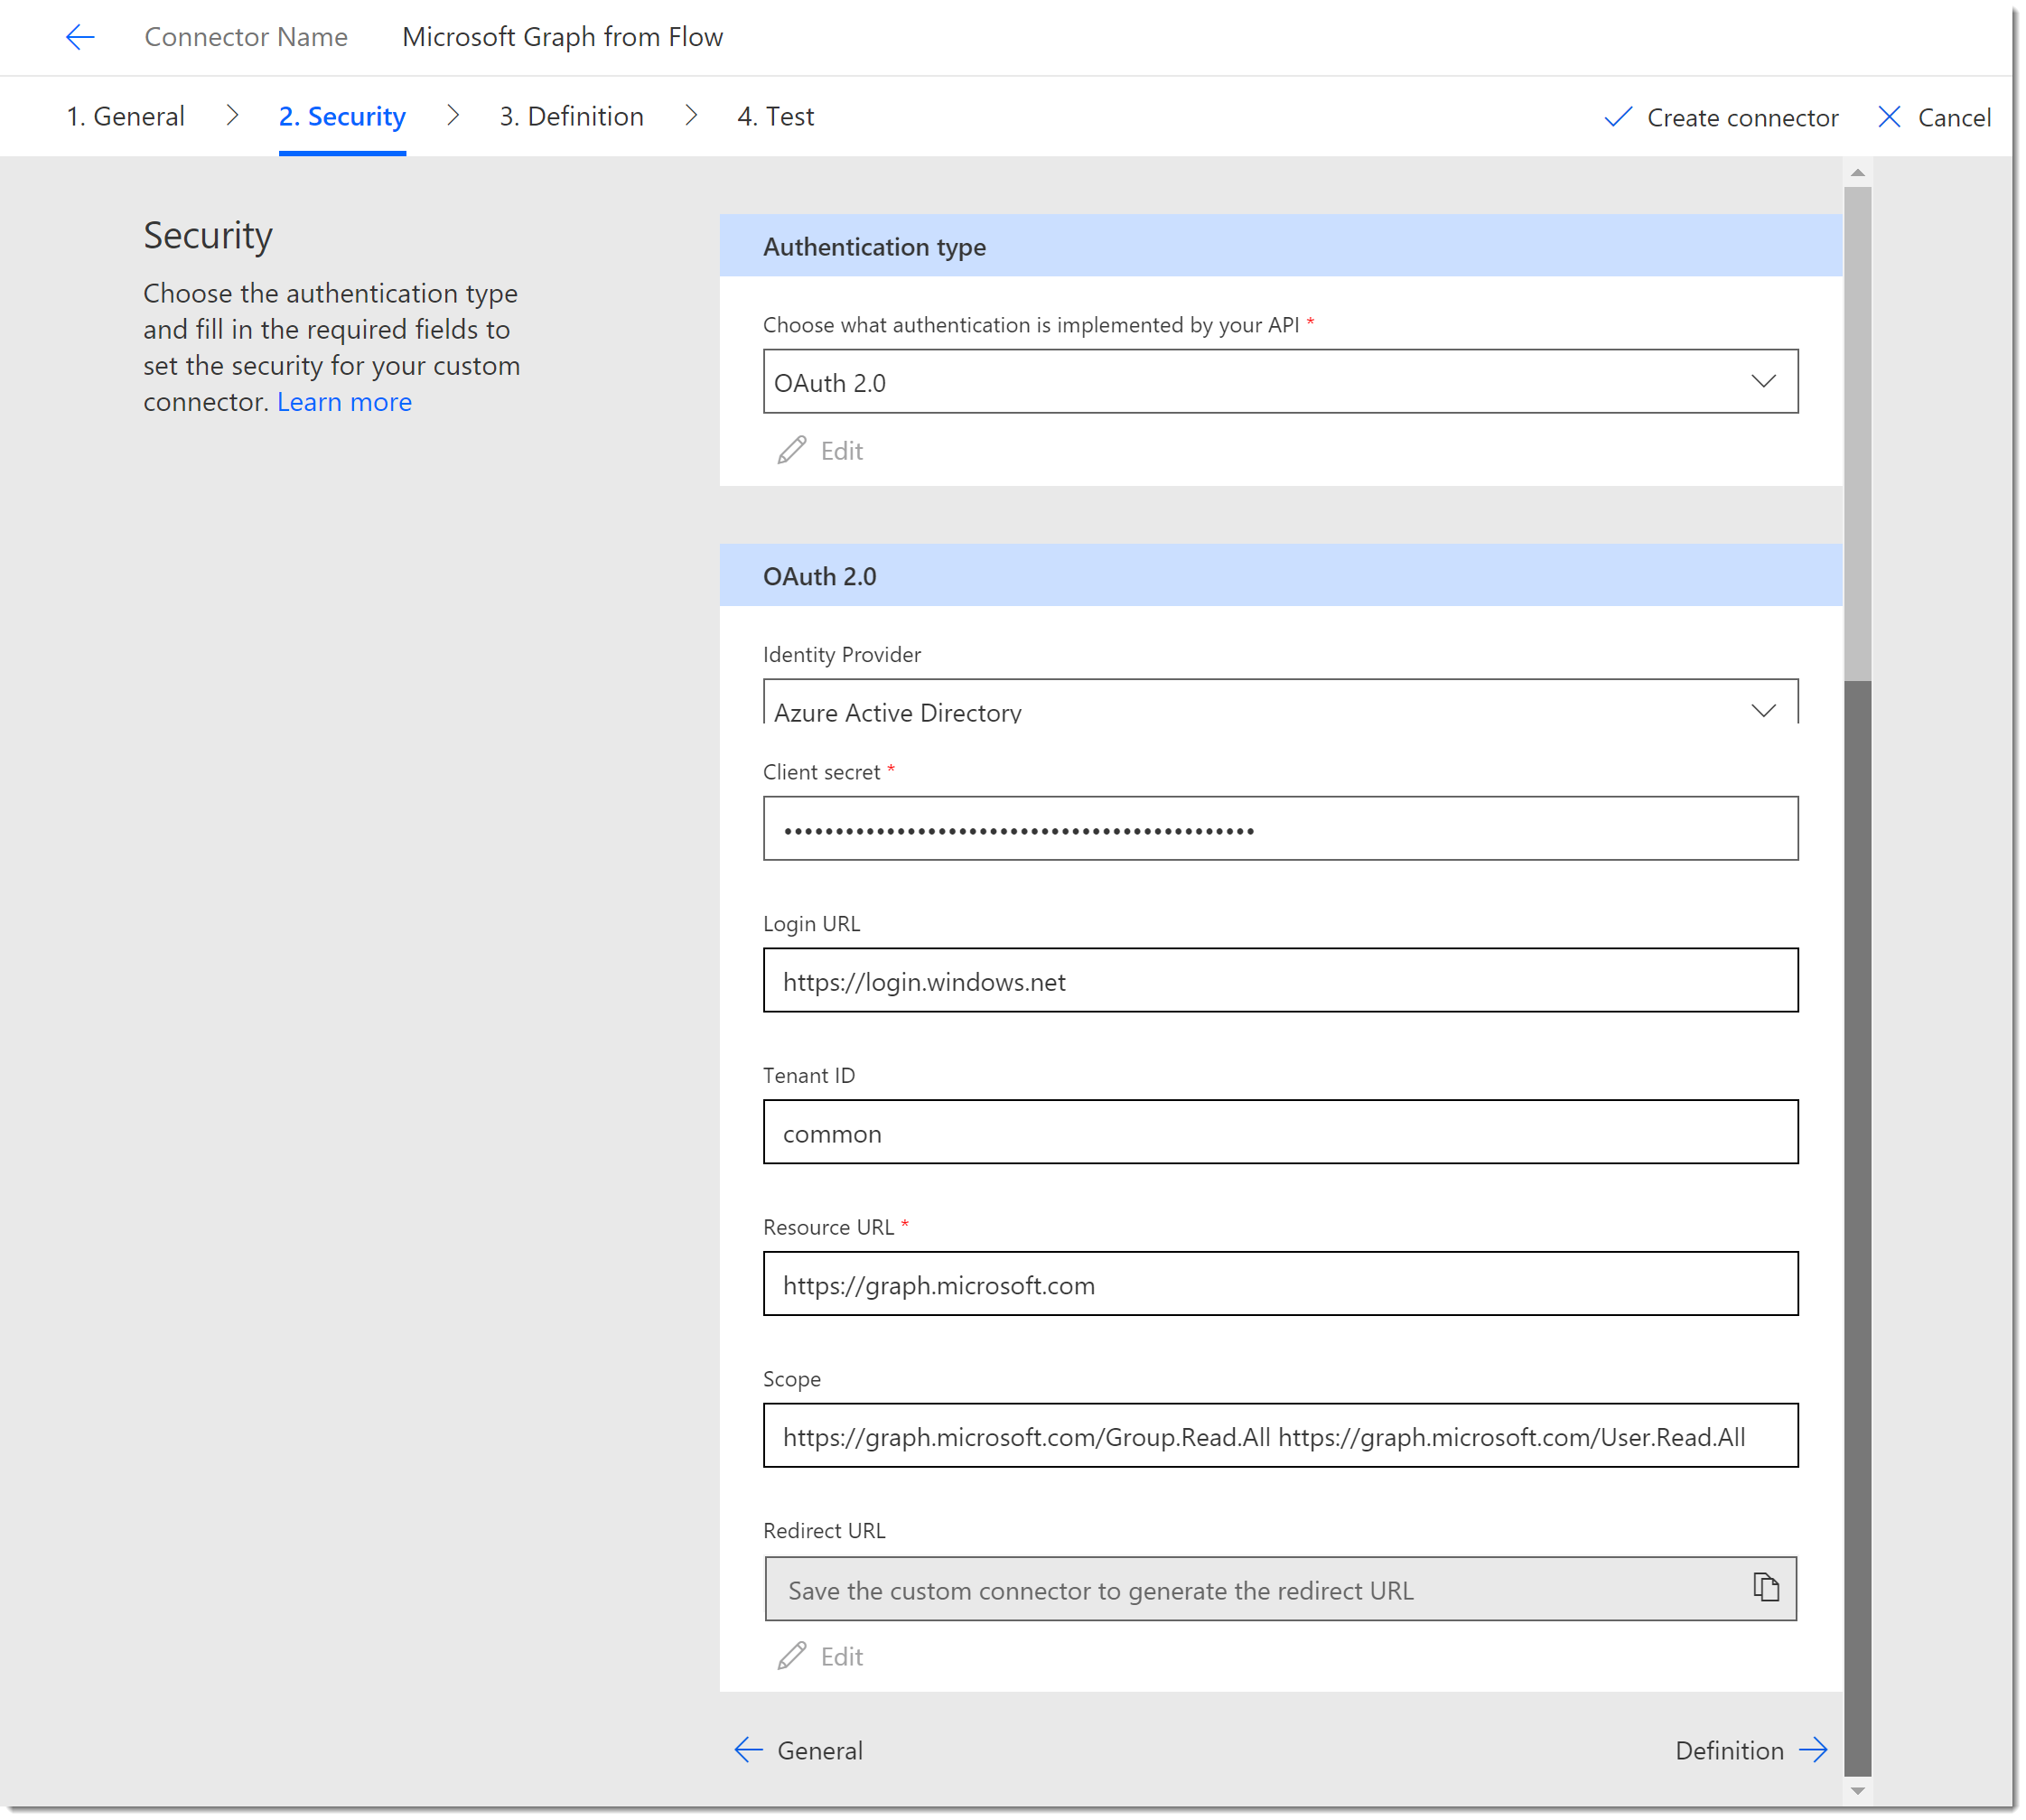
- Click the Security tab and select OAuth 2.0 as the API. Change the Identity Provider to Azure Active Directory. Complete the rest of the configuration as follows:
- Client id: The client or app id from Azure
- Client secret: The client or app secret from Azure
- Login URL: https://login.windows.net
- Tenant ID: common
- Resource URL: https://graph.microsoft.com
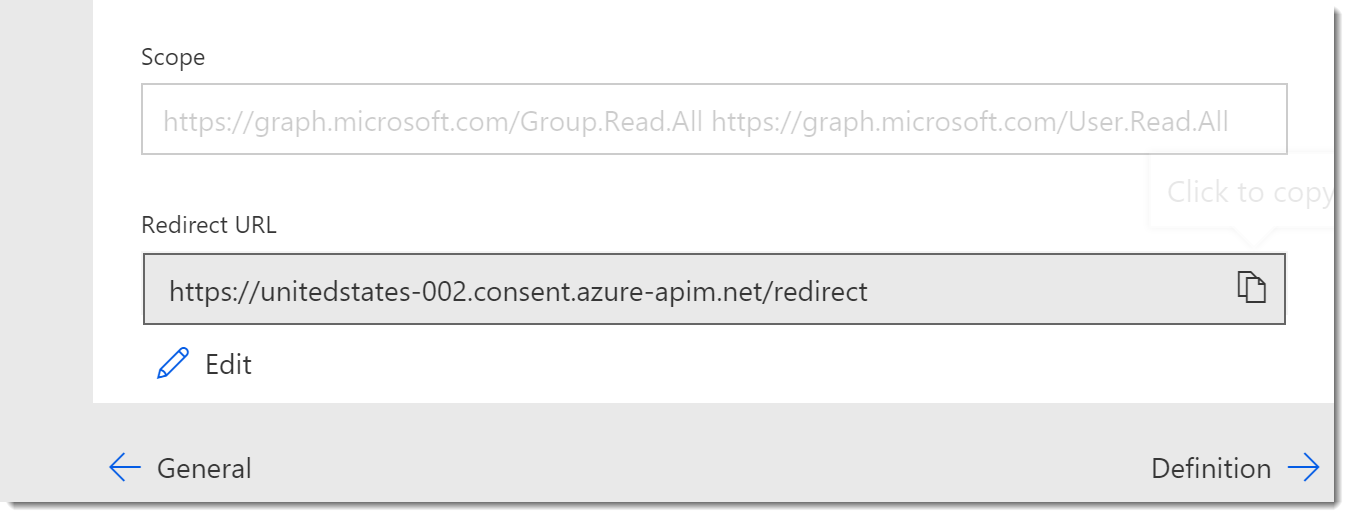
- Scope: https://graph.microsoft.com/Group.Read.All https://graph.microsoft.com/User.Read.All
- Redirection URL: This will be generated when we save the connector. You will then copy it back to your app in Azure so that the connector can authenticate. Cool isn’t it!
Custom Connector Definition
- Click the Definition tab.
- In my case I have two different Actions defined. (Remember we did one for “Me” and one for “Groups”.) We only need one, but I like using the “Me” request for troubleshooting. Scroll to the Request section and you should see the URL property with the Groups path. If not choose the other Action.
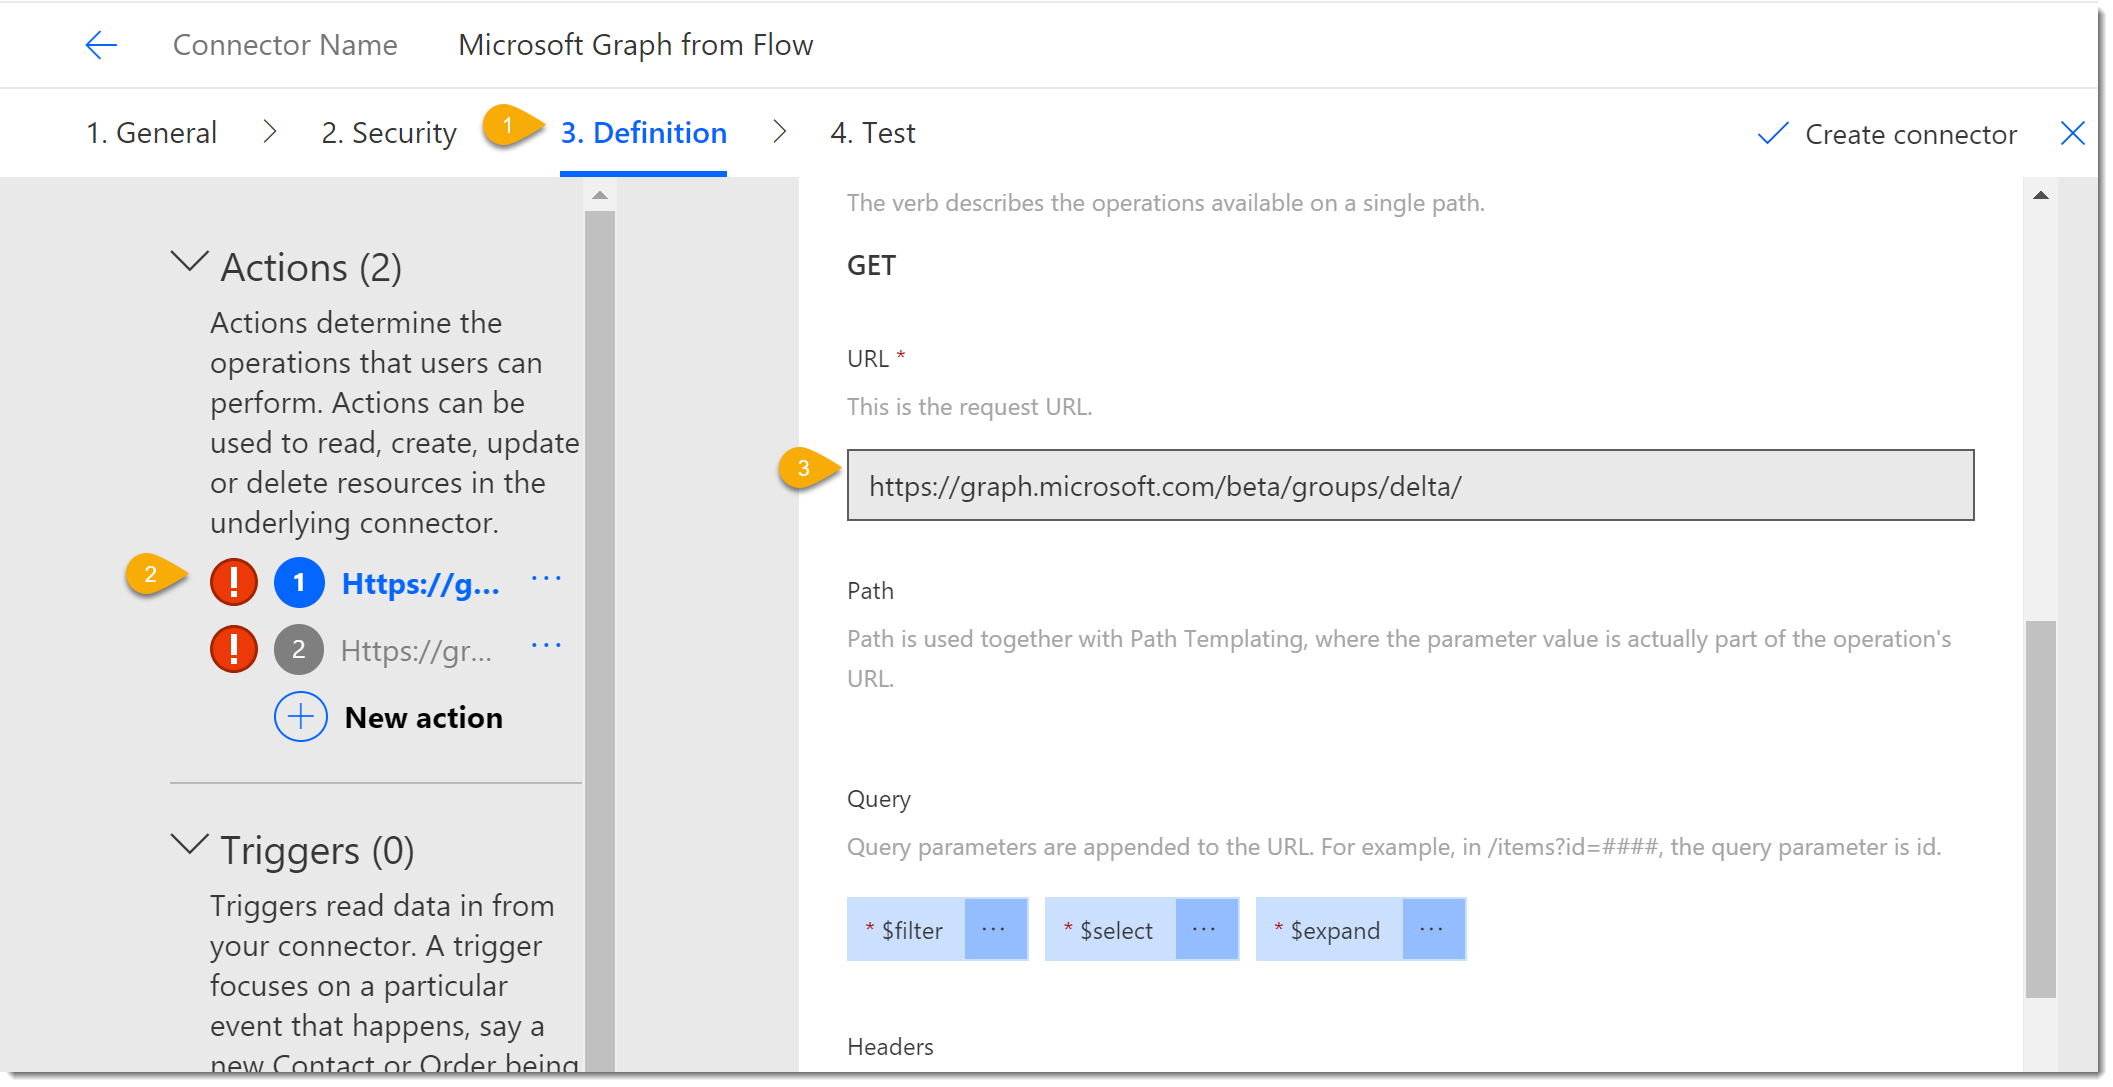
- Scroll back up to the General section and complete the details as follows:
- Summary: Microsoft Graph Groups Delta Request
- Description: Microsoft Graph Groups Delta Request
- Operation ID: GetGroupsDelta
- Click on the second Action and complete the General section as follows for the “Me” request:
- Summary: Microsoft Graph Me Request
- Description: Microsoft Graph Me Request
- Operation ID: GetMe
- At this point the errors should be gone and you should be able to click Create Connector to save your work.
App Redirect URL Update
Once you save your connector you should see on the Security tab that the Redirect URL has been updated.
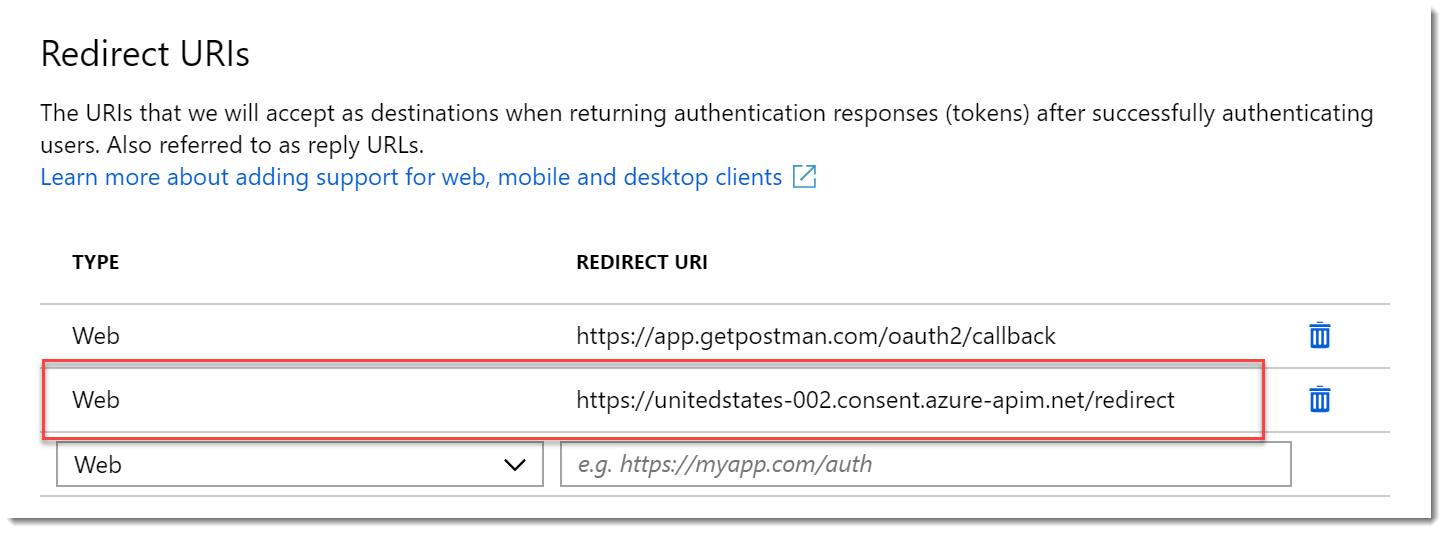
- Copy the Redirect URL from the Security Tab and return to your App in Azure.
- In Azure, on your App home page, add the Redirect URL to your app as you did before by clicking the link for Redirect URIs.
- On the Redirect URIs page add the URL you copied as type Web. Click Save.
Test the Connector
- Click on the Test tab.
- Click New Connection. You will be prompted to authenticate.
- Your new connection will be added to the Selected connections list.
- Choose the GetMe Action and click Test operation.
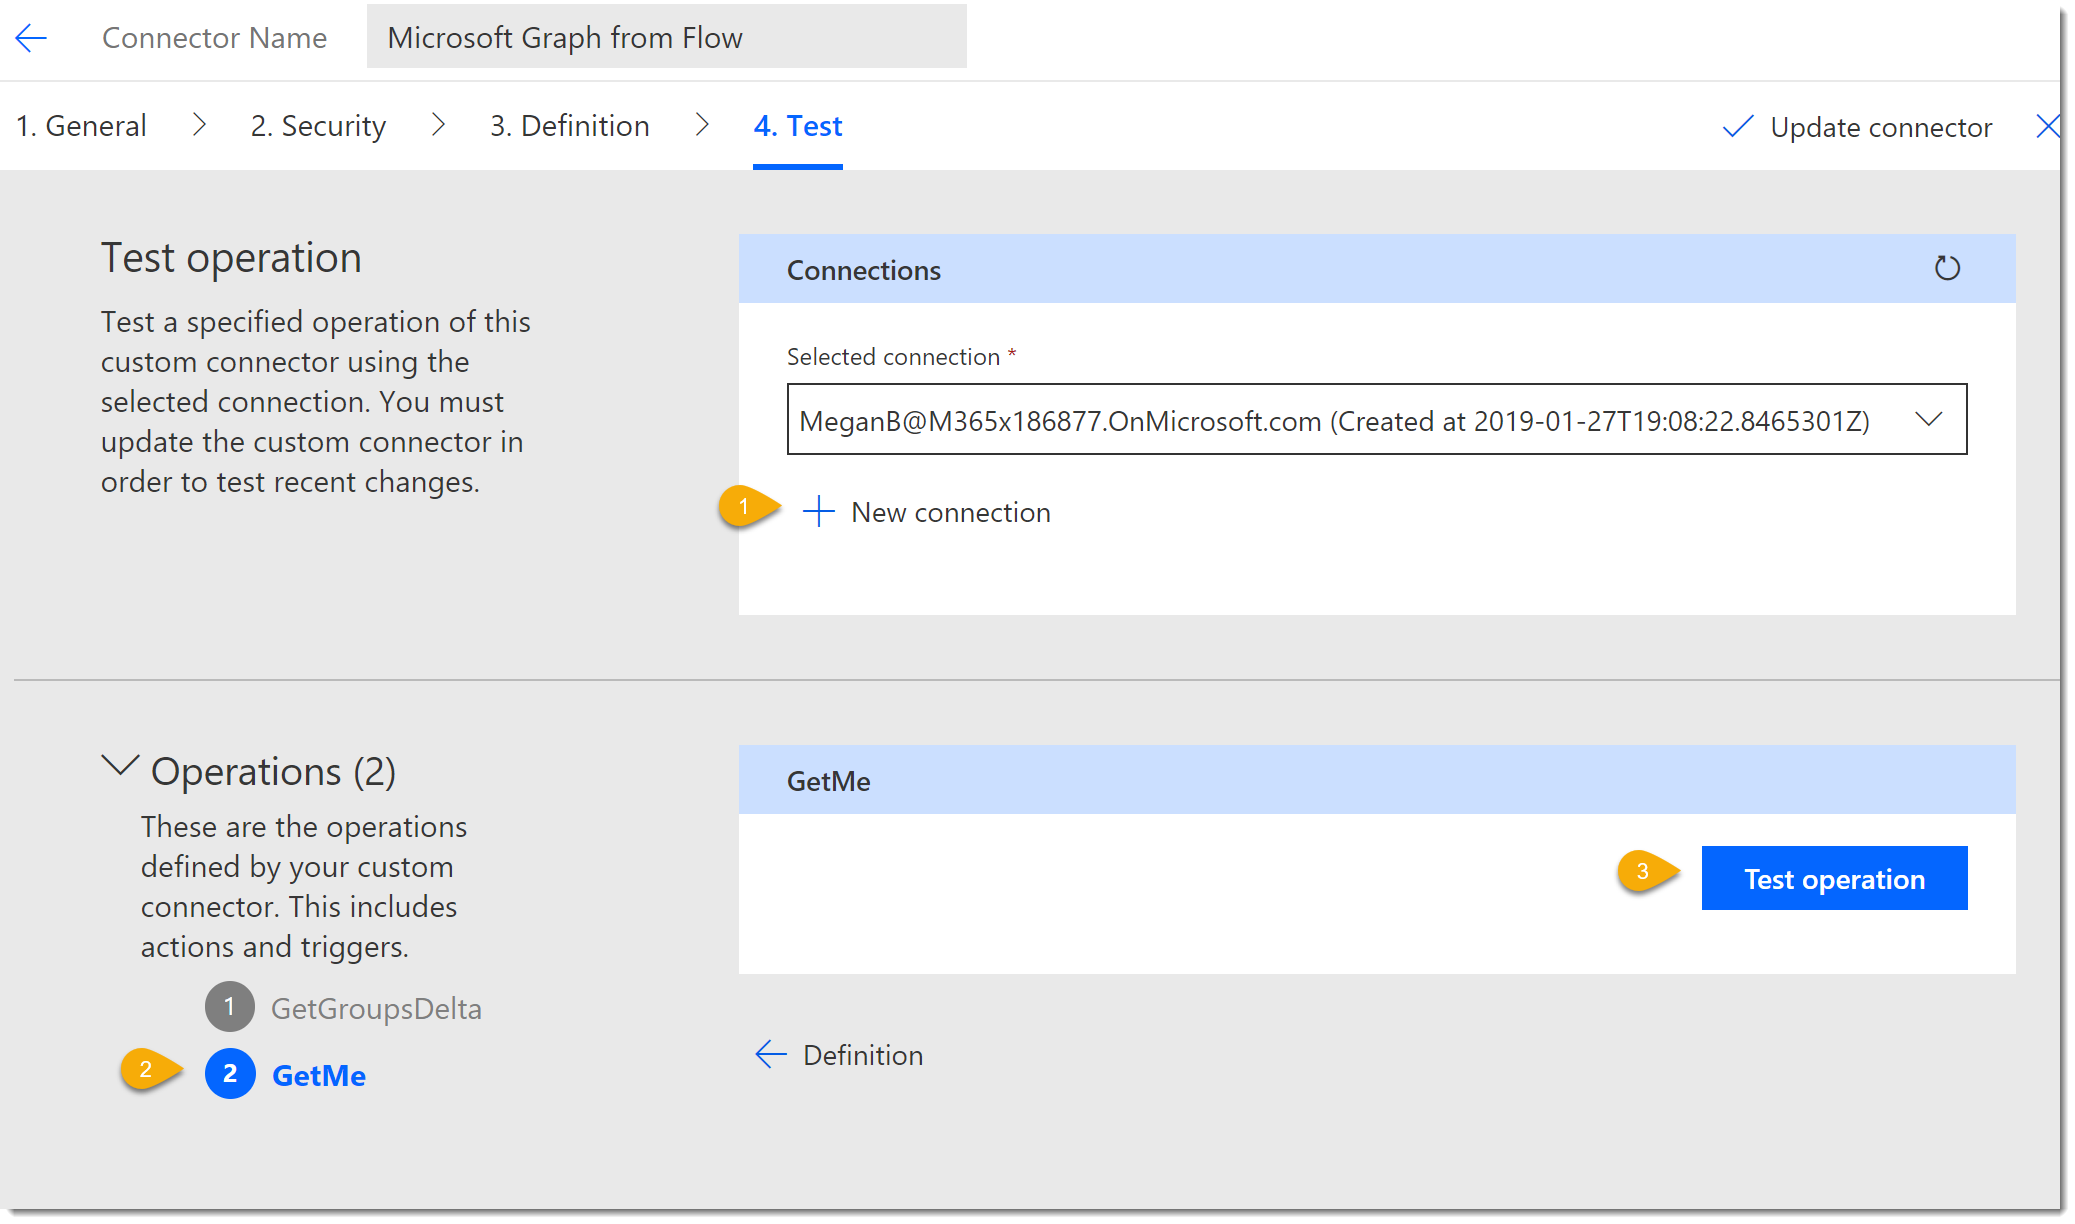
- The operation should return an OK 200 Status like it did in Postman.
- Choose the GetGroupsDelta Action. Notice that the settings have been preserved from Postman. Click Test operation.
- The operation should return an OK 200 Status like it did in Postman.
- Click Update connector.
We have a bit more work to do, but at this point you can use the Connector in your Flows.
Use the Connector in Microsoft Flow
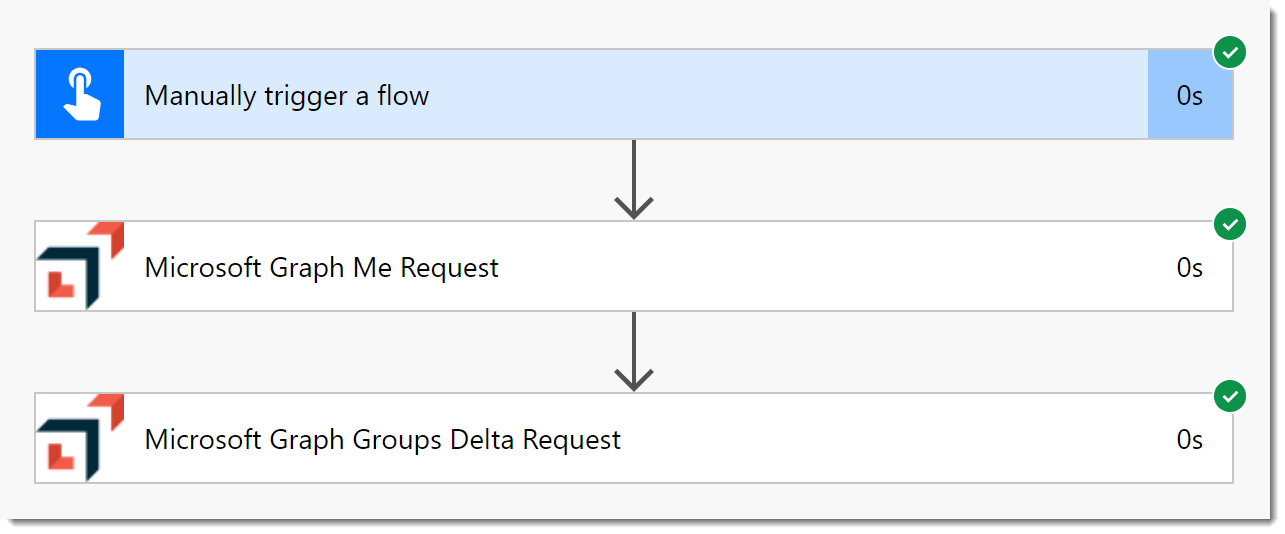
- Create a New Flow. Start simple, from a blank template and trigger on a Flow Button.
- Click New step.
- Search for your connector by name.
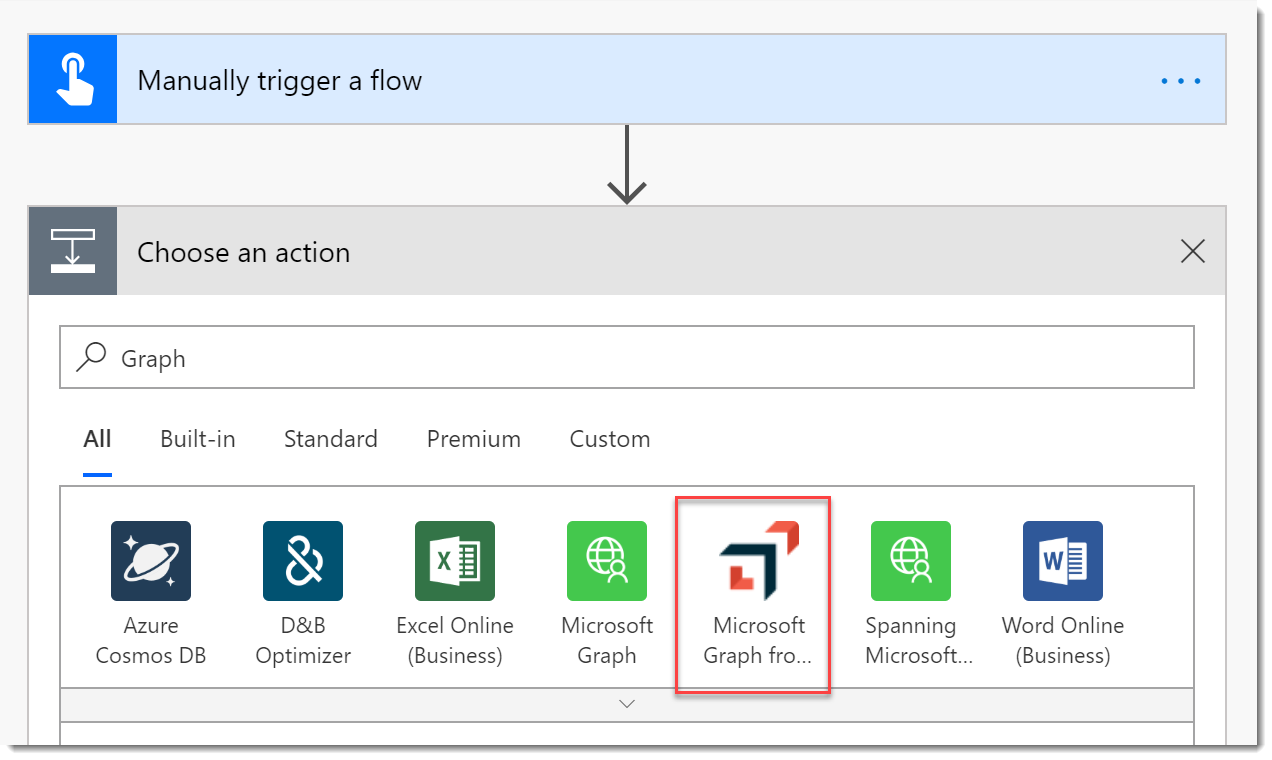
- Choose the connector and you should see the two Actions.
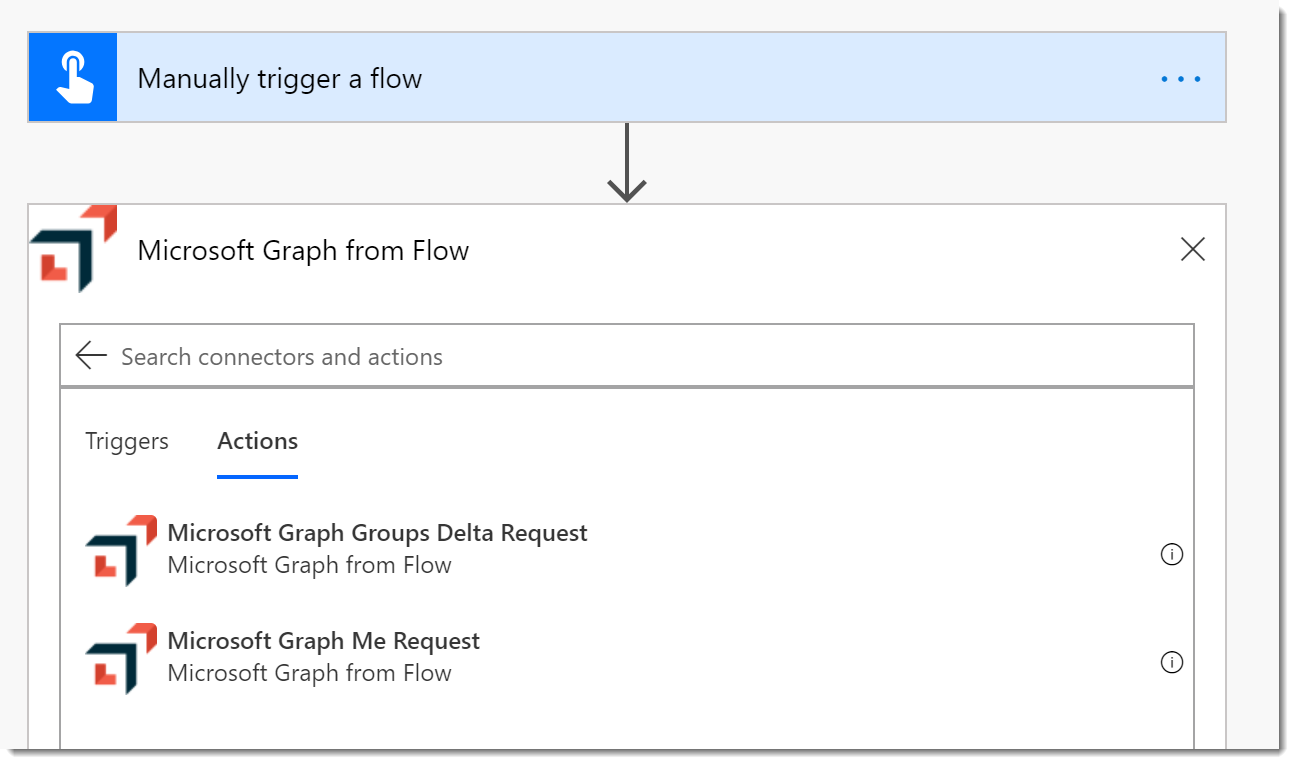
- Add the Me Action and the Groups Delta Action.
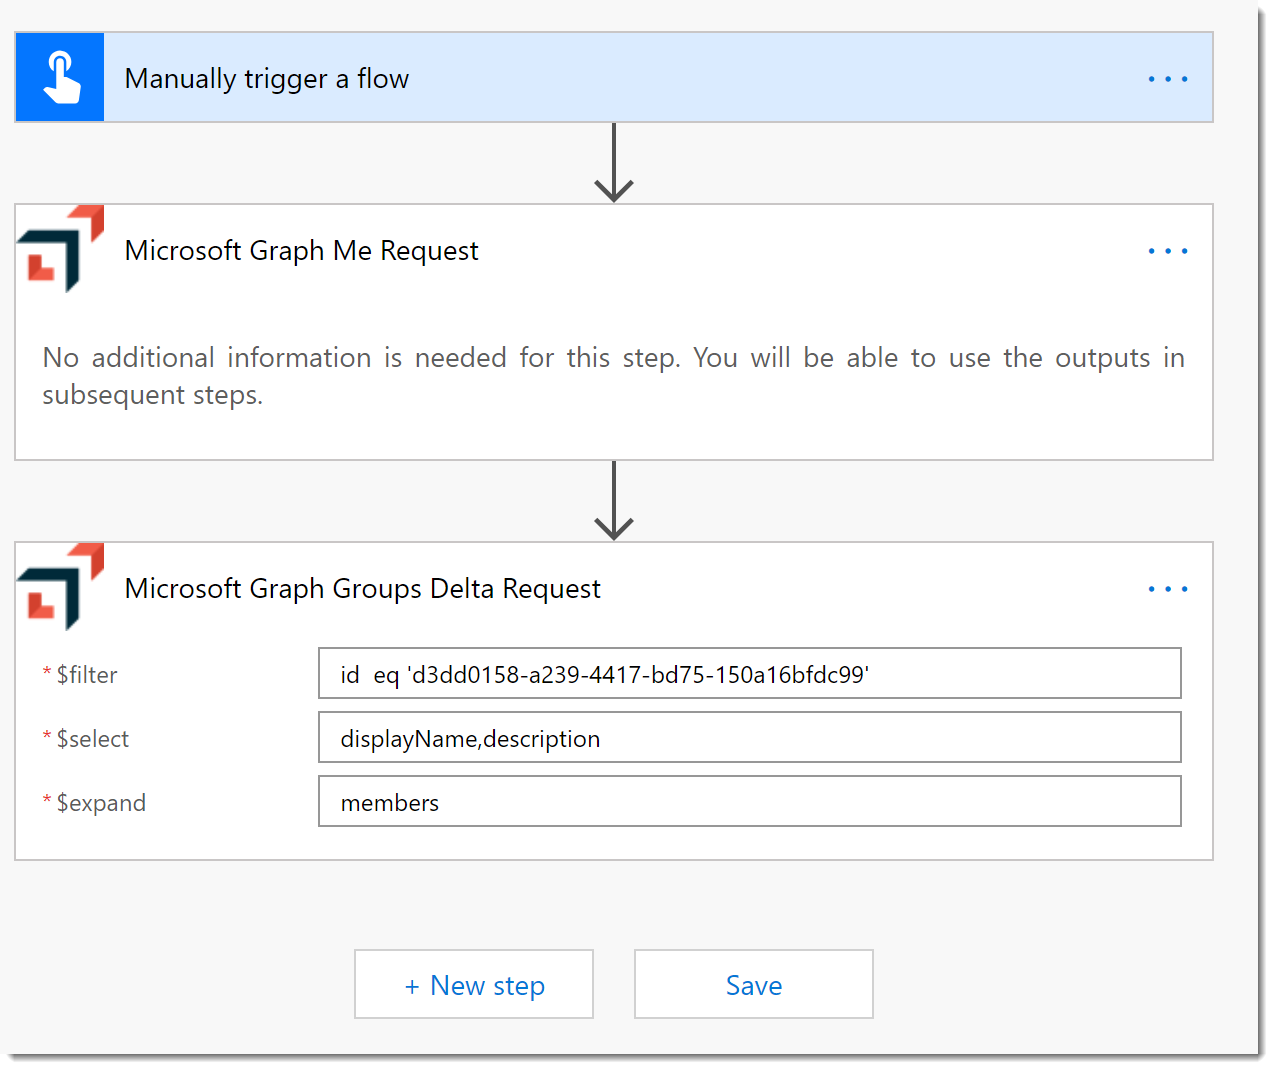
- Click Save
- Click Test and click Continue to approve the connection.
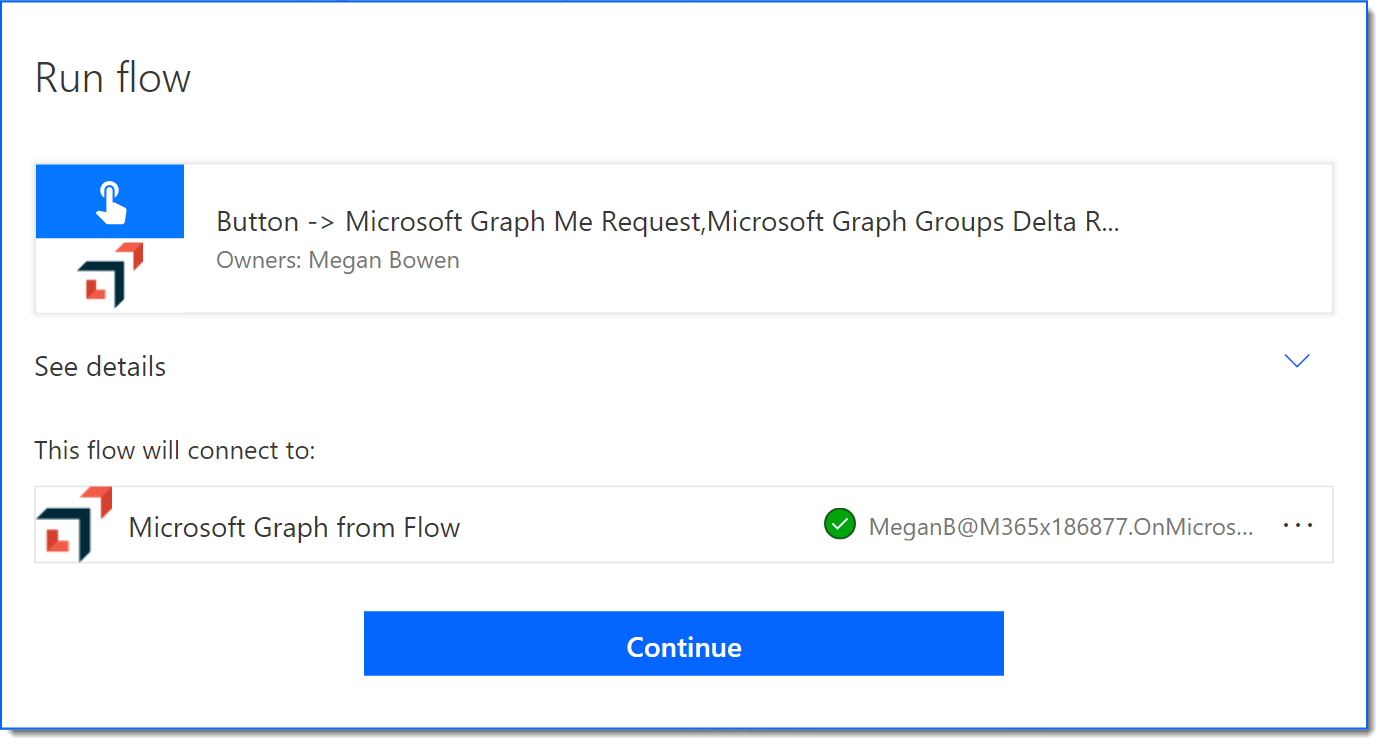
- Click Run Flow. Click Done to see the results of the test.
So, it works. It’s “good” but not “great”. For example, if you try to use the output right now, all you will see is the Body. We saw in the previous posts that you can add a Parse JSON action and then apply the output schema. Wouldn’t it be nice to not have to do all that?
Update the Connector with the Response Schema
From now on I am just going to focus on the GetGroupsDelta Action. If you recall from the Postman session or the previous post series, there are three possible requests we can make, New, Delta, and Skip. (There are others, but these will suffice for our demo.) This URL includes the additional query string parameters we need.
https://graph.microsoft.com/beta/groups/delta/?$filter=id%20eq%20'd3dd0158-a239-4417-bd75-150a16bfdc99'&$select=displayName,description&$expand=members&$skiptoken=&$deltaToken=This following response has been edited to include the additional return parameters.
{
"@odata.context": "https://graph.microsoft.com/beta/$metadata#groups(displayName,description,members)",
"@odata.deltaLink": "https://graph.microsoft.com/beta/groups/delta/?$deltatoken=rUj7-LdP8JZhP1eR4xwz8RFLB10gzqT4VuUmz2aba8tcB5NxzFGmUQgI3AlFDJJc4d9ZzgtsbBAsOodPpYW4d-mq1jGwJJxgeIx7w06Sfj1lZ3DjfrZ5LK84qT-c_5ghdwmt96DHVOrgfscS",
"@odata.nextLink": "https://graph.microsoft.com/beta/groups/delta/?$skiptoken=rUj7-LdP8JZhP1eR4xwz8RFLB10gzqT4VuUmz2aba8sDbpfE38oeFi6if63K9w1nK9VN1n4yiakdtAI8XJ_8vQUL4rbSs8El740j...",
"value": [
    {
    "displayName": "Spanning Protected Users",
    "description": "Users protected by Spanning Backup for Office 365",
    "id": "d3dd0158-a239-4417-bd75-150a16bfdc99",
    "members@delta": [
        {
        "@odata.type": "#microsoft.graph.user",
        "id": "e2e6d7ad-eb03-4466-a05c-74dee6b60b10",
        "@removed": {
            "reason": "deleted"
        }
        },
        {
        "@odata.type": "#microsoft.graph.user",
        "id": "13af31a2-18e9-432e-bb21-c6989c85af18"
        },
        {
        "@odata.type": "#microsoft.graph.user",
        "id": "d04f8905-55e3-4be9-af52-5c4abe131989"
        }
    ]
    }
]
}- Return to the Definition tab in the Custom Connector editor. Choose the GetGroupsDelta Action.
- Notice in the Request section there are only query parameters for
$filter,select, and$expand. We need to add the other options. Click Import from sample. - Complete the Import from sample blade as follows:
- Verb: GET
- URL: The whole URL from above.
- Click Import.
- You should see the 5 query parameters now available.
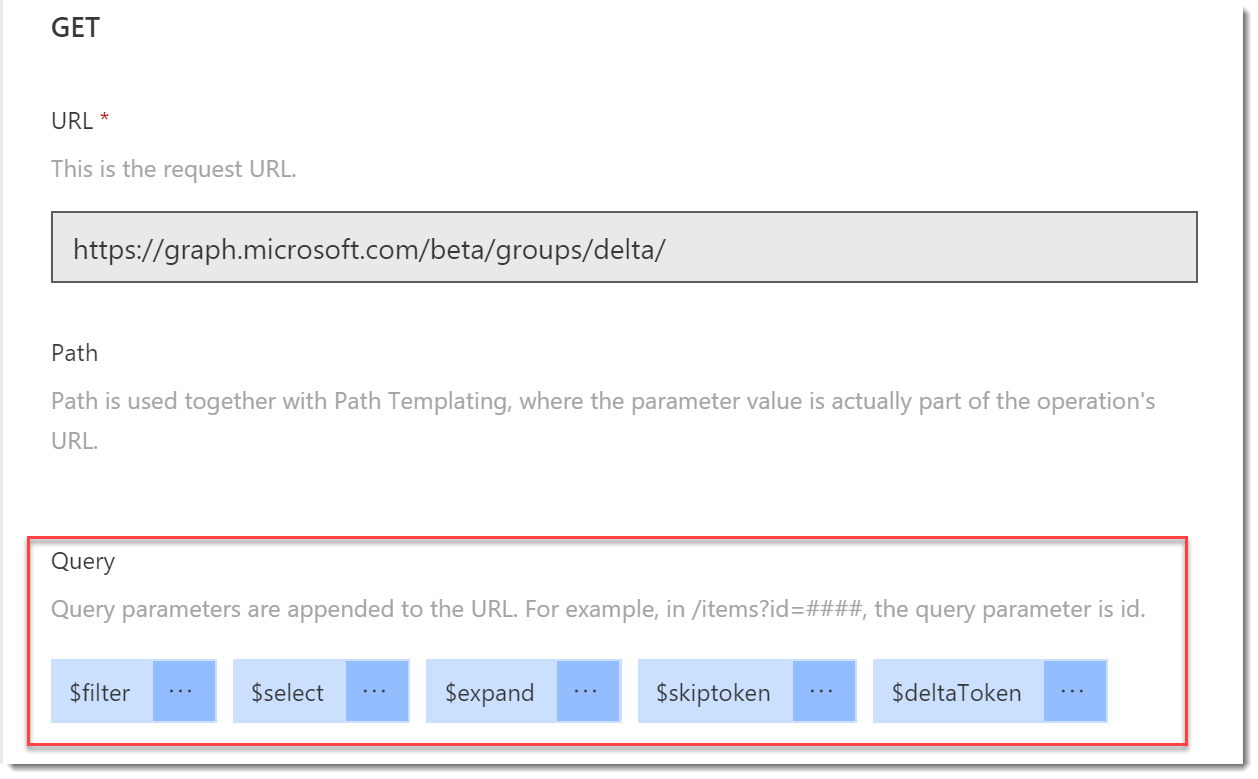
- In the Response section, click Add default response.
- On the Import from sample blade, paste in the JSON response from above. I added all the different response fields so they can be resolved.
- Click Import. Nothing will change in the Response section.
- Click Update connector.
- Click the Test tab and you should see the parameters available.

Improved Custom Connection
- Delete the previous Flow.
- Start a new Flow as you did before. Start from a Blank and add a manual trigger.
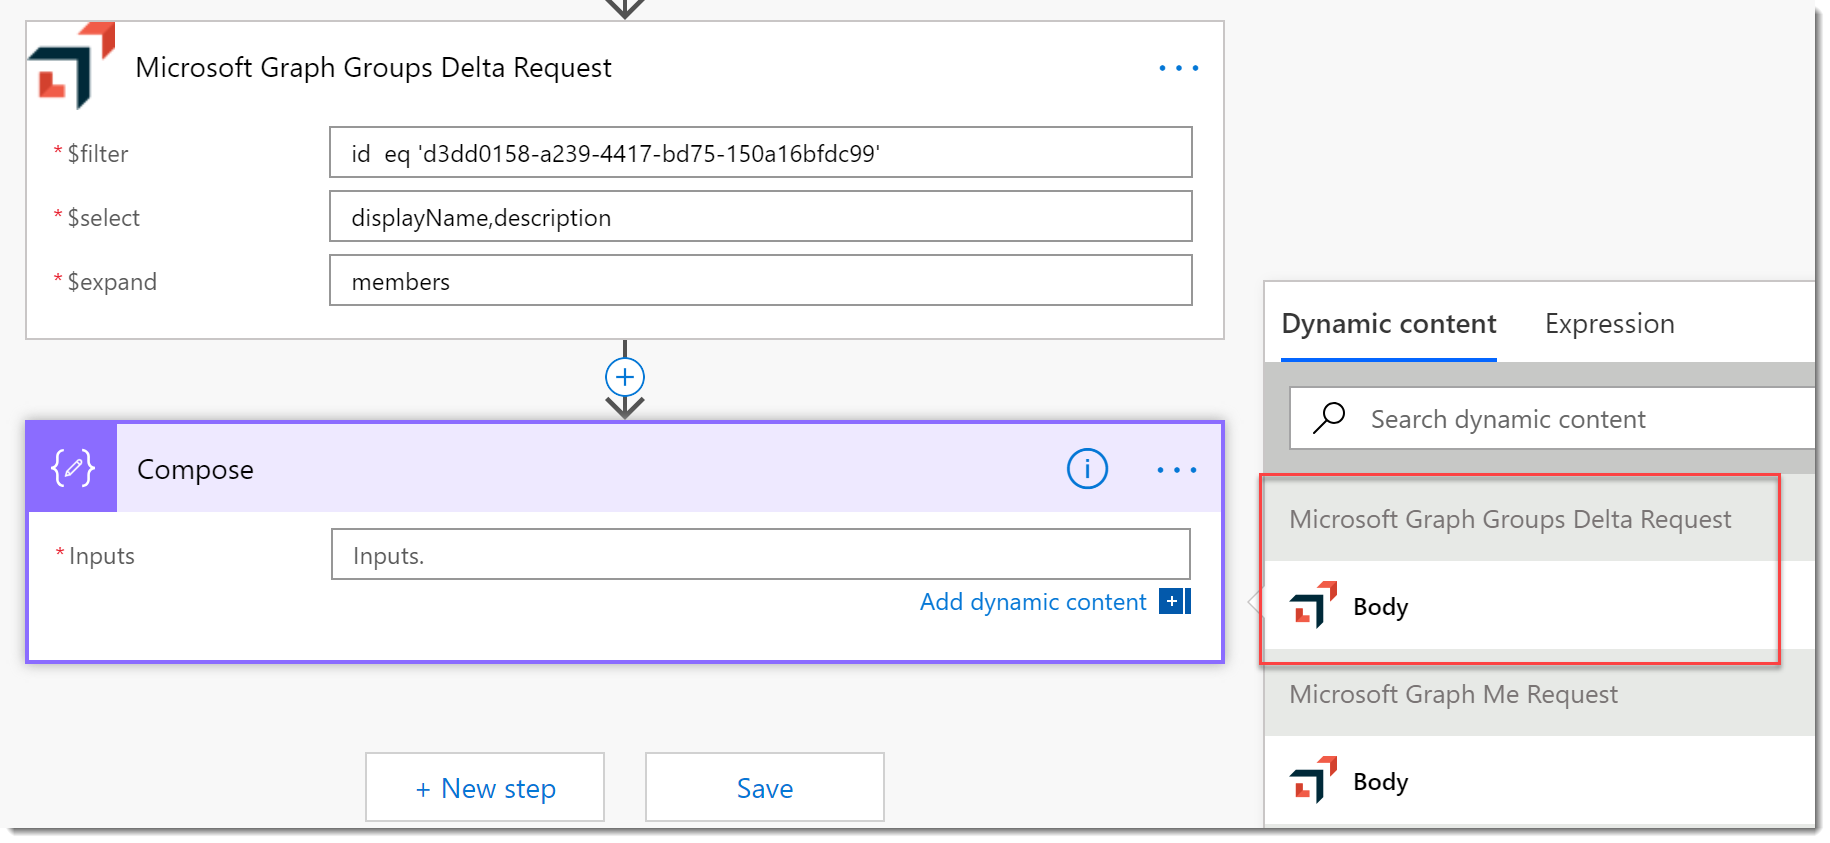
- Add a Microsoft Graph Groups Delta Request as you did before. Configure it as follows:
- $filter: id eq ‘{{group-id}}’ (where
{{group-id}}is the AAD Group Id) - $select: displayName,description
- $expand: members
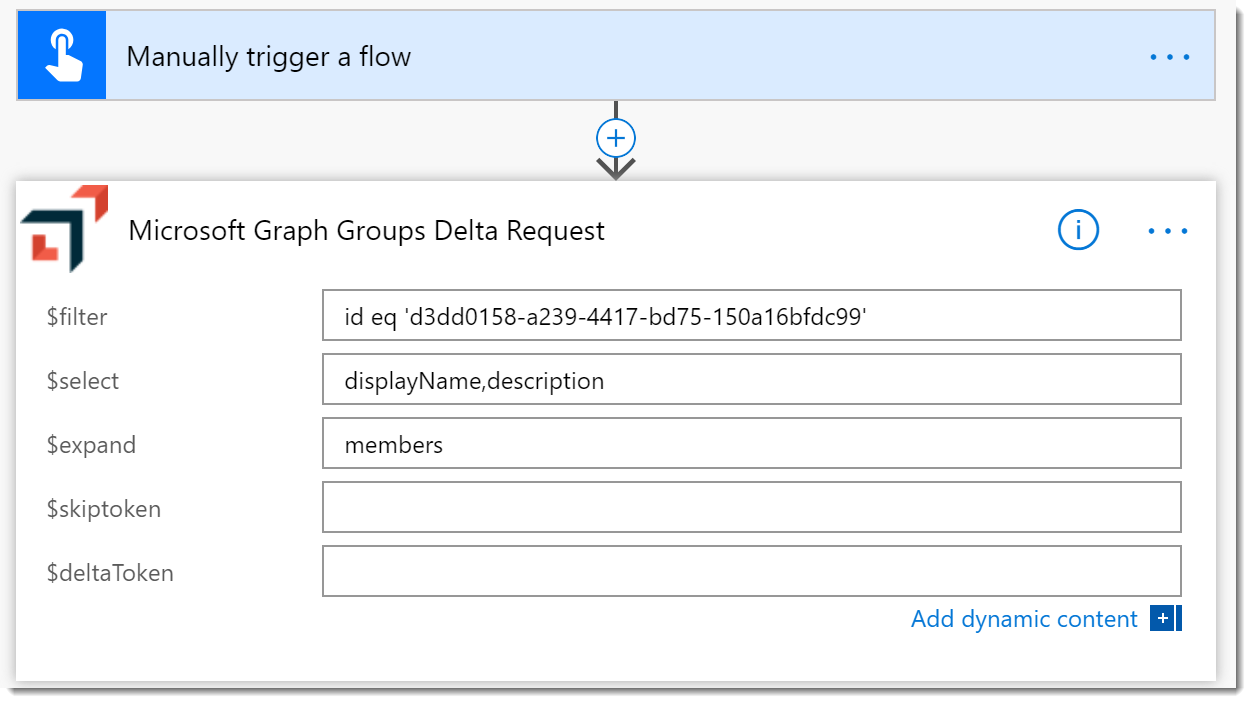
- $filter: id eq ‘{{group-id}}’ (where
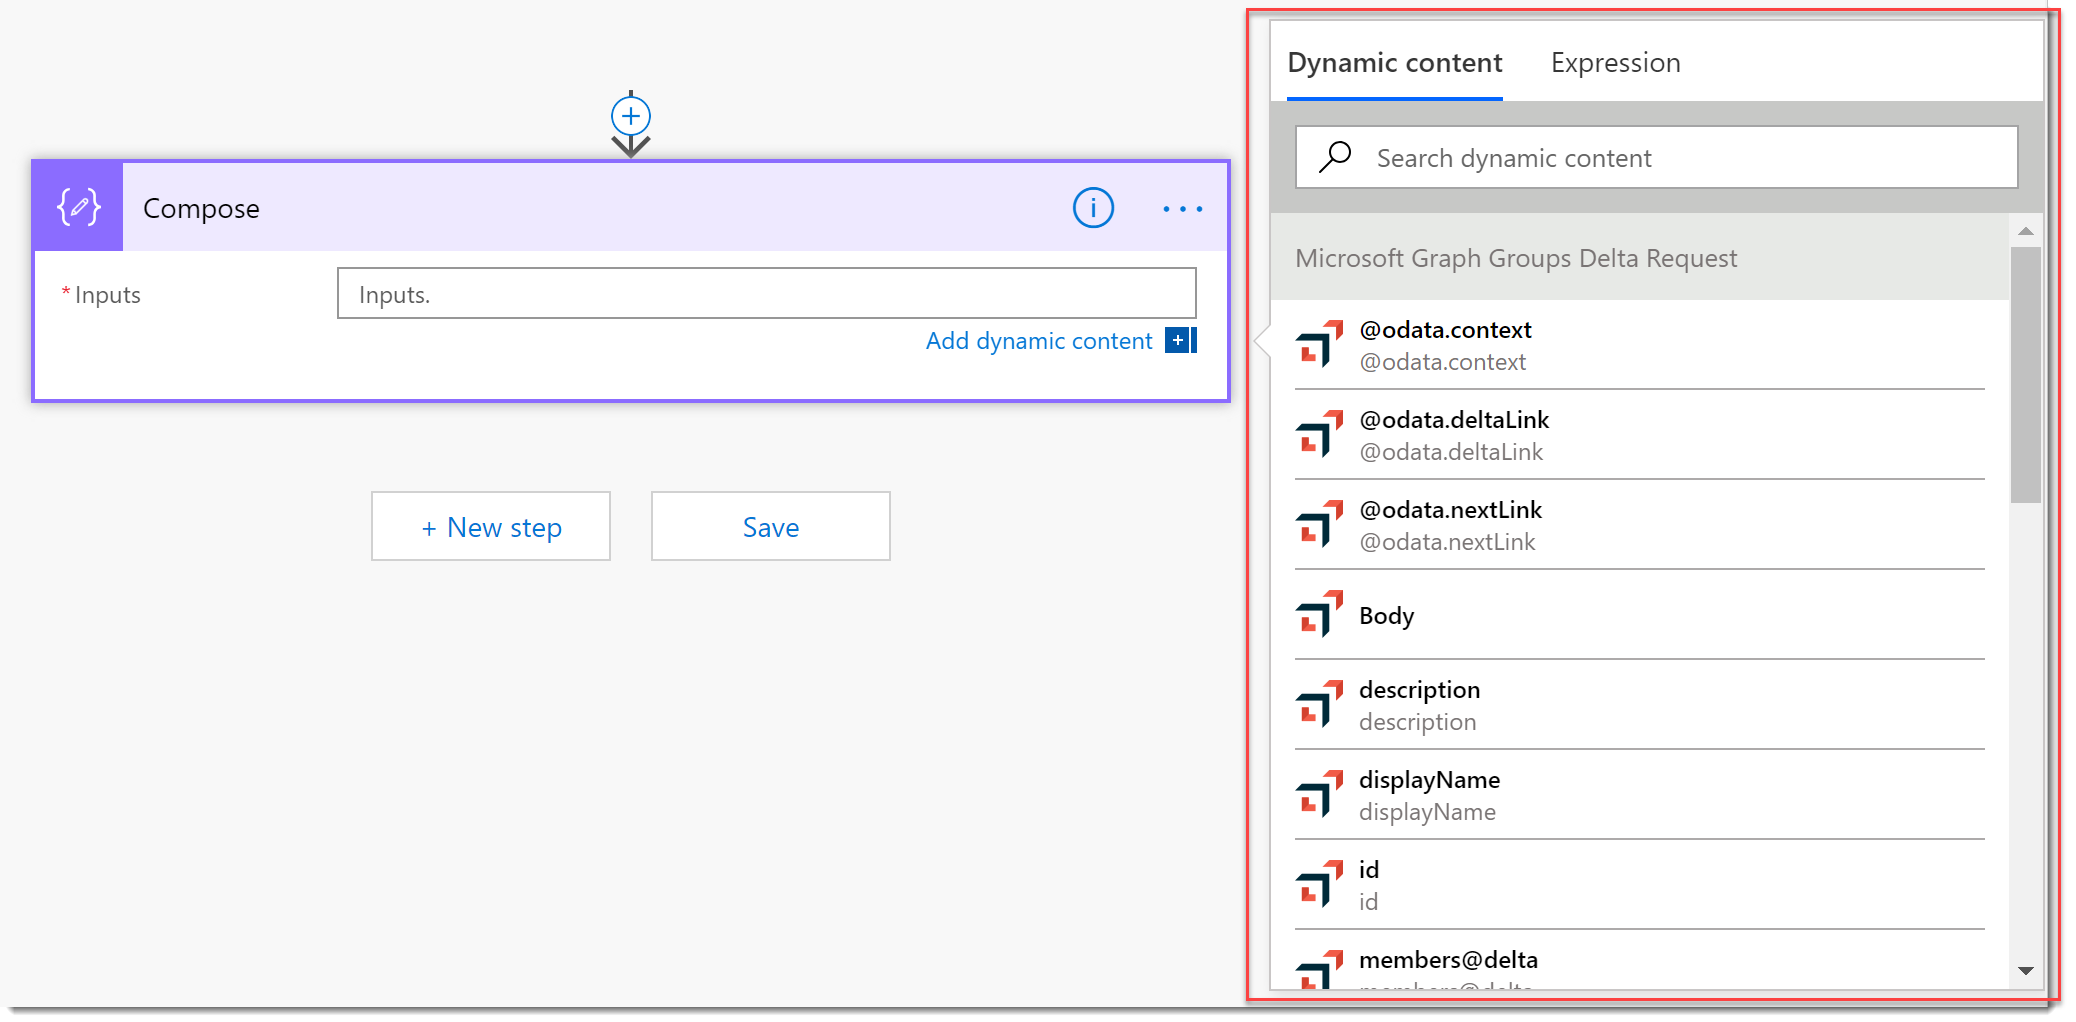
- Add a Compose action to the bottom of the Flow. Click in the Inputs field and behold the results of your work! All the properties of the response are available to you now.
Conclusion
Consider the possibilities now. Any API, any function, anything you can describe is available from Microsoft Flow because you can create a Custom Connector. I stopped short of using all this in a real Flow. I’ll do that in the video.